Installation of RasPBX
A few years ago I came across a very interesting project from some guy, who created a GSM bridge between two RasPBX hosts and who wanted to make free long distance calls from Brazil to Germany with the help of his RaspberryPi. That sounded just cool, but other project were waiting for me at that time and I didn’t had a time for that. Until now.
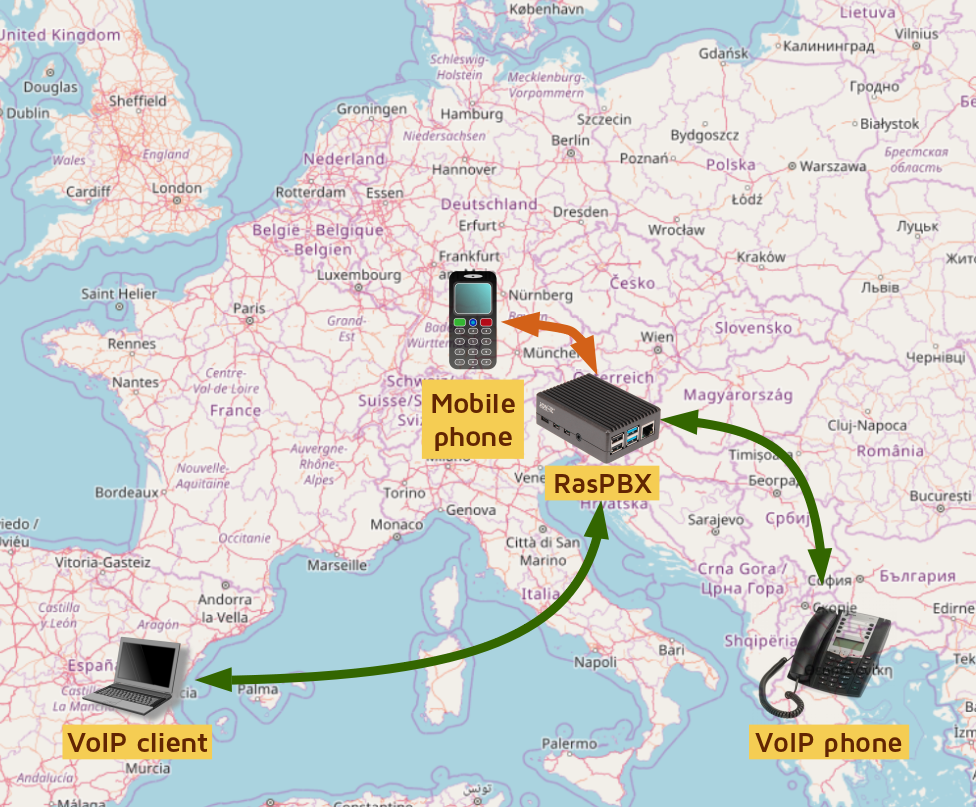
So, what are we intend to do? I am going to show you, how you can install telephony server Asterisk on a small computer RaspberryPi in order to be able to make calls from your computer or smartphone to ordinary phone numbers. So basically, you will end up literally with your own PBX in your pocket. Actually no, because RaspberryPi needs to be connected to power supply and network, and you would look weird with cables going into your pocket, but you get the idea.
But why would you do that? Well, besides from this sounds like a really cool project and you like hacking and learning, you can cover some interesting scenarios like:
- You have a small company and you would like to have your own PBX with the ability to call outside.
- Because of COVID-19, you would like that your employees can work at home, but have company phones.
- You would like to have the ability that your customers can call you and use your own automated voice system for customer support.
- You would like to have free telephone (audio and video) calls through internet, but on your own infrastructure.
- You are living in one country, but you have business and mobile phone from the other country. And roaming between these two countries is expensive, so you would like to be able to use internet to relay your calls between these two countries via internet for free.
- You are travelling abroad and would like to reduce roaming costs, but be accessible on your home mobile number for calls and SMS messages.
- You are travelling abroad, but would like your mobile operator to think you are located at your home (i. e. hide your location data).
For me, most important scenario is, that I would like to travel abroad (in the countries with high roaming costs), and be able to receive calls and SMS messages to my home mobile number. So if I receive a SMS message from my bank, I want that this SMS is delivered to my e-mail address. I would also like to be able to send SMS messages back to my bank. I would like to be able to receive phone calls and if I am without internet connection, the person calling me should be able to leave me a voice message which will be then delivered into my e-mail address. And of course, I would like to be able to call them back from my number.
So in this article I will show you how you can do that. More specifically, how to install RasPBX to RaspberryPi, install USB dongle and create a trunk to mobile phone network through that dongle for your endpoints. Sounds complicated? Well, it turns out, it is not.
But first things first. RaspberryPi, RasPBX, Asterisk, FreePBX, USB dongle, trunks, endpoints… what are you talking about???
Basic concepts
So, very brief explanation of basic concepts. RaspberryPi is a small computer, which was originally developed for the promotion of teaching computer science in schools. However, project evolved, and today there are several models of RaspberryPi available, with all kinds of accessories. But the most important thing is, that RaspberryPi computers are relatively cheap (they cost between 40 and 100 EUR, depending of the model and accessories you want to buy) and that they are a great tool for learning new things. So, every true hacker - and here we are using term hacker in a positive way, so by hacker we mean an expert at programming and solving problems with a computer - should have one (or more) of these devices in his or her arsenal. For running RasPBX, you will need RaspberryPi 3 or RaspberryPi 4, additionally you would like to buy strong enough power supply (3A) and a case for your RaspberryPi. If your power supply is not strong enough, your RaspberryPi will not be able to handle the GSM dongle power consumption, and it will start rebooting. In that case, you will need to buy powered USB hub.
RasPBX is an operating system for your RaspberryPi, based on a Debian Linux, which has integrated Asterisk and FreePBX software, so you don’t need to install them by yourself. You can download RasPBX from the project’s official website, and here I am using version 10-10-2020 (raspbx-10-10-2020.zip), which has included Asterisk 16.13.0 and FreePBX 15.0.16.75. BTW, if you noticed the word Linux - yes, RasPBX is opensource and completely free. Just click download and you are good to go.
Asterisk is a software implementation of a private branch exchange (PBX). Basically, it is a voice over IP and telephony software used to establish and control telephone calls between telecommunication endpoints (which can be ordinary telephones or so called softphones - VoIP applications on an computer or mobile phone). Well, actually it is much more that that, but what is important, is to know that this software is opensource and free (however, there are several paid modules available), and that this software is used by many telecommunication companies around the world for very commercial purposes. So it is not just some funny toy, it is a serious project, with a lot of capabilities, which means hours of hours of fun learning and creating nice projects. BTW, did I mention, Asterisk is opensource and free?
FreePBX is web-based open-source graphical user interface (GUI) that manages Asterisk. Any yes, it is also opensource and free.
USB dongle in RasPBX is a special USB device, actually USB modem in which you can insert SIM card and then connect this modem to a computer (in our case RaspberryPi) through USB port. There are several USB modems available, but not all are working with RasPBX. Compatible USB modems should be unlocked and must have voice capability enabled. You can buy one from the list of officially supported. They cost around 20 EUR, you can also buy used one, but if it is not unlocked, you will need to use DC Unlocker, which will cost you some additional money. (And DC Unlocker works only on Windows). I have used Huawei E1752C, but you can consider buying some other from the supported models. BTW, instead of USB dongle, you can setup RasPBX to be paired with mobile phone via Bluetooth connection and you can make calls through that connection, but I didn’t tested that.
Of course, you will need a SIM card, and before you insert SIM card in your USB modem, you should disable SIM card’s PIN. You can do this with your phone, if you don’t know how just be a hacker and use a search engine. :)
In telecom, trunking is used to connect two systems together. To put it simply, a trunk is a connection from your system (PBX) to other telephone system. From that trunk you can route outgoing and incoming calls.
Endpoint is basically your internal phone number (in your PBX), which is used by softphones (VoIP clients) and physical phones. Internally, you can use any numbering, but I decided to use internal PBX numbers like 1000, 2000, 3000, etc.
Enough talking, let’s hack it together!
What you will need
As we already mentioned, you will need:
- RaspberryPi 3 or RaspberryPi 4 (I have tested both, however, RPi4 is much more powerful and can handle up to 200 concurrent phone calls (really, I am not joking). I suggest you buy RPi4 with 4 or 8 GB RAM);
- power supply for RaspberryPi (3A or more), case for RaspberryPi and a SD card (8 GB is minimum, but I suggest buying 32 GB and of a little bit more quality);
- compatible USB dongle (I am using Huawei E1752C);
- RasPBX, which you can freely download from the official project’s website (I am using version 10-10-2020);
- internet connection.
Additionally I am also using my own VPN network, and I will show you, how to fence your PBX inside VPN network. I am using OpenVPN, with several security enhancements, hardened cryptography settings, etc. But I am not going to talk about how to set up your own VPN network, I will just assume you already have one. If you don’t, you can hire me to set up one for you.
So let’s start.
Installation of the operating system
First we will take a look into the installation of a basic system. Since it is Linux, it helps, if you are familiar with Linux, but if you are not, just follow the installation instructions and you will be fine. However, I assume you already know how to use terminal and how to login to a remote Linux system using SSH. Hint: under Windows you can use PuTTY or built-in SSH client from Windows command prompt.
Also, please note, that I am using Ubuntu Linux as my main operating system, and setting up some things (like SSH connections) are a little bit different under Linux and Windows. But don’t worry, you can always use your favourite search engine and learn something new. (Or maybe you can start using Linux?)
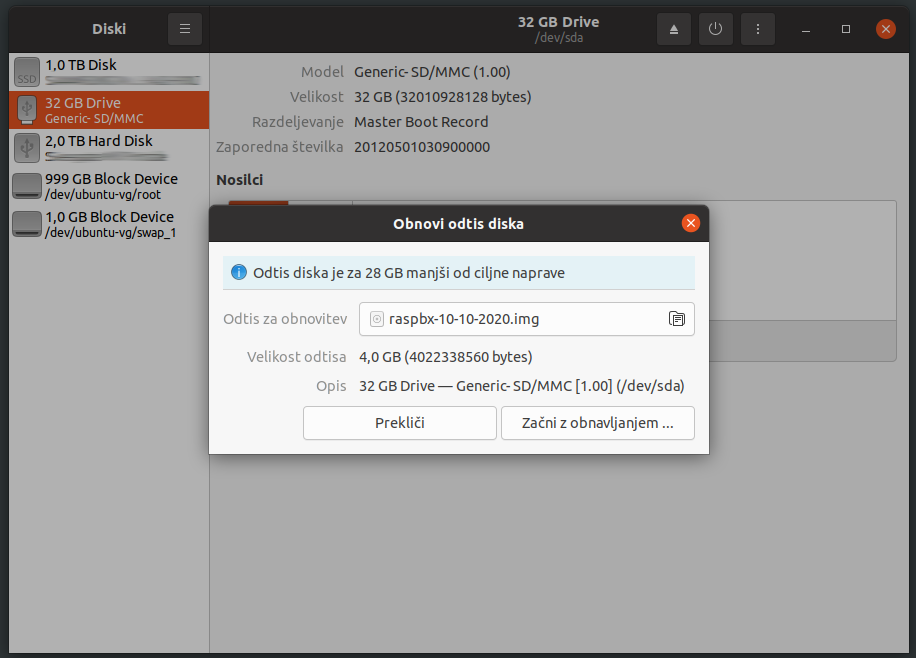
Write RasPBX image to a SD card
After you download RasPBX file raspbx-10-10-2020.zip you should unzip it and write .IMG file to your SD card. For this I prefer Ubuntu’s Disks tool, but if you are using other operating systems, just perform online search and find which tools can you use for that.
Then insert SD card into RaspberryPi. SIM card in your USB dongle. Connect USB dongle to RaspberryPi. Connect your network cable… And finally - connect the RaspberryPi to power supply.
Log in to the RasPBX device
After booting the RaspberryPi device, we need to find out it’s IP address. There are several ways how to do that, but a true hacker would prefer command line tool nmap.
So lets say nmap 192.168.1.0/24 in your terminal (use the network where you and your Raspberry are connected, in my case it was 192.168.1.0/24, but your local network settings may be different), and look for a device like that:
Nmap scan report for 192.168.1.150
Host is up (0.0091s latency).
Not shown: 994 closed ports
PORT     STATE SERVICE
22/tcp   open  ssh
53/tcp   open  domain
80/tcp   open  http
139/tcp  open  netbios-ssn
445/tcp  open  microsoft-ds
8088/tcp open  radan-http
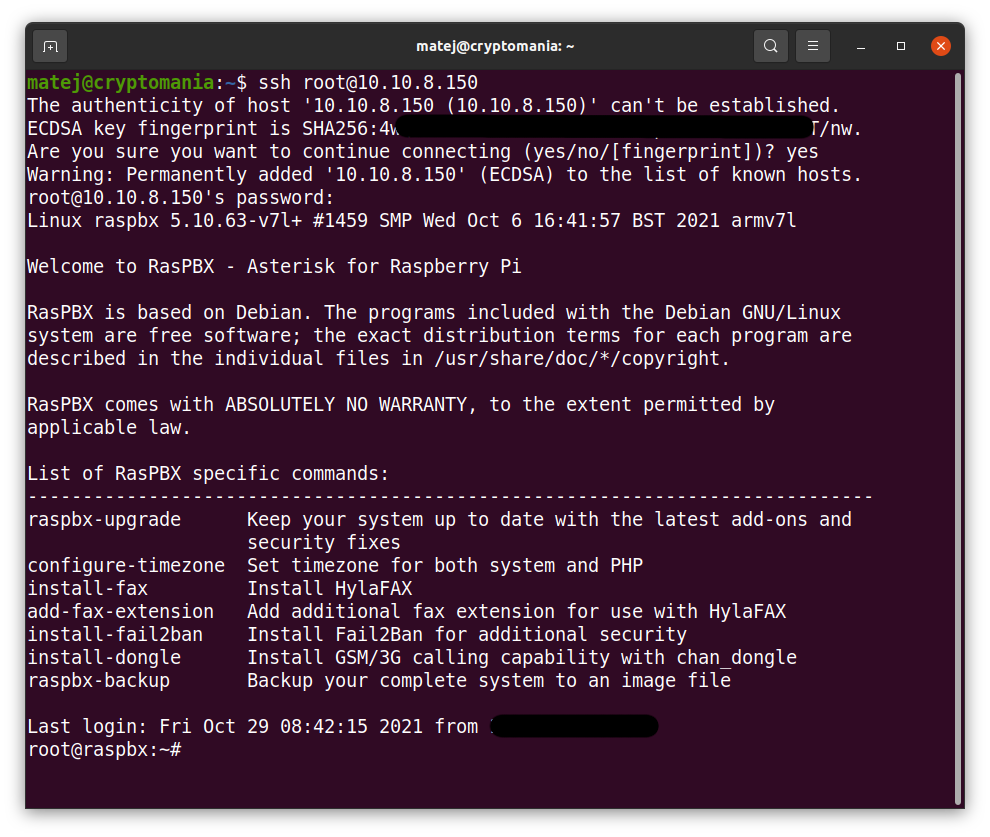
Now you can connect to a device via SSH. Username is root and default password is raspberry: ssh root@192.168.1.150. You will need to confirm the identity of RaspberryPi’s SSH key:
The authenticity of host '192.168.1.150 (192.168.1.150)' can't be established.
ECDSA key fingerprint is SHA256:vtE5/xxxxxxxxxxxxxxxxxxACyoanxxxxxxxxxxxmDQ.
Are you sure you want to continue connecting (yes/no/[fingerprint])? yes
Warning: Permanently added '192.168.1.150' (ECDSA) to the list of known hosts.
…and after successful login, we can see welcome screen on your RasPBX device:
Linux raspbx 5.4.51-v7l+ #1333 SMP Mon Aug 10 16:51:40 BST 2020 armv7l

Welcome to RasPBX - Asterisk for Raspberry Pi

RasPBX is based on Debian. The programs included with the Debian GNU/Linux
system are free software; the exact distribution terms for each program are
described in the individual files in /usr/share/doc/*/copyright.

RasPBX comes with ABSOLUTELY NO WARRANTY, to the extent permitted by
applicable law.

List of RasPBX specific commands:
-----------------------------------------------------------------------------
raspbx-upgrade      Keep your system up to date with the latest add-ons and
                    security fixes
configure-timezone  Set timezone for both system and PHP
install-fax         Install HylaFAX
add-fax-extension   Add additional fax extension for use with HylaFAX
install-fail2ban    Install Fail2Ban for additional security
install-dongle      Install GSM/3G calling capability with chan_dongle
raspbx-backup       Backup your complete system to an image file
First things to do after login
First, change the password with the command passwd.
Then create new SSH host keys in order to have individual keys for your setup: regen-hostkeys.
Then configure your timezone: configure-timezone. Since I am living in Slovenia, Europe, I set it to Europe/Ljubljana.
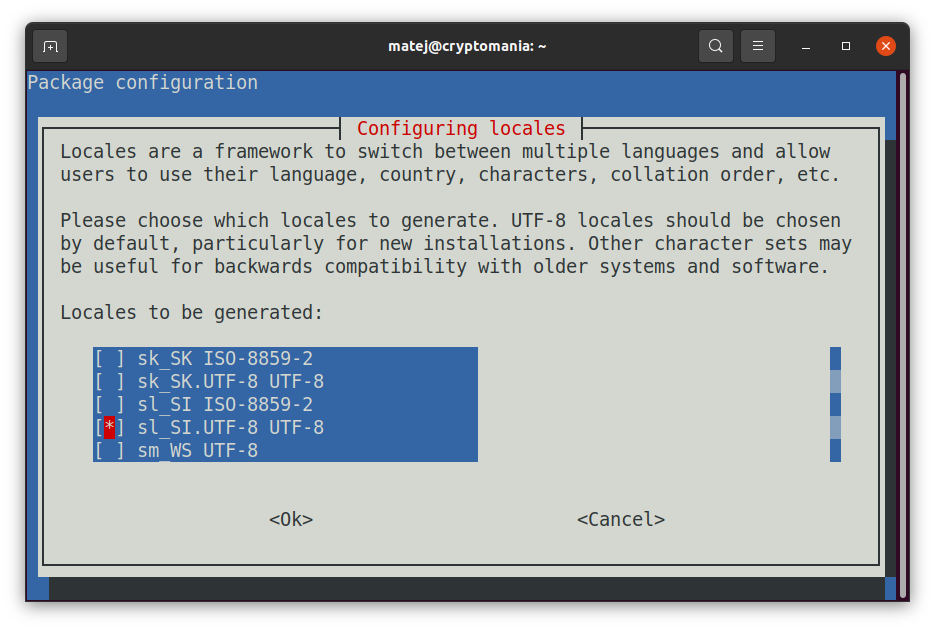
Then you should reconfigure locales: dpkg-reconfigure locales. In my case I added support for Slovenian local settings (sl_SI.UTF-8 UTF-8), and for default locale I selected en_GB.UTF-8.
Then it is time for security upgrades. For this we can use raspbx-upgrade comand, however, running this command will return us an error. Error message says error occurred during the signature verification, and that is because of one expired GPG key used to digitally sign some RaspPBX packages:
The following signatures were invalid: EXPKEYSIG B188E2B695BD4743 DEB.SURY.ORG Automatic Signing Key <deb@sury.org>
Reading package lists... Done
E: Repository 'http://raspbian.raspberrypi.org/raspbian buster InRelease' changed its 'Suite' value from 'stable' to 'oldstable'
So we need to download and install new signing key with a command: wget -O /etc/apt/trusted.gpg.d/php.gpg https://packages.sury.org/php/apt.gpg.
Now we can update the repositories with apt update. However, we will see some warnings, which will be gone after we will install all upgrades to the system:
E: Repository 'https://packages.sury.org/php buster InRelease' changed its 'Suite' value from '' to 'buster'
N: This must be accepted explicitly before updates for this repository can be applied. See apt-secure(8) manpage for details.
Do you want to accept these changes and continue updating from this repository? [y/N] y
Here we should answer Yes (type y and press enter).
Get:5 https://packages.sury.org/php buster/main armhf Packages [328 kB]
E: Repository 'http://raspbian.raspberrypi.org/raspbian buster InRelease' changed its 'Suite' value from 'stable' to 'oldstable'
N: This must be accepted explicitly before updates for this repository can be applied. See apt-secure(8) manpage for details.
Do you want to accept these changes and continue updating from this repository? [y/N] y
Here we should also answer Yes (type y and press enter).
Then we can upgrade all the software with apt upgrade command, and finally remove unused program packages with apt autoremove.
Since now, we can safely use raspbx-upgrade, which is basically just a script performing update and upgrade commands in one step.
Finally, we can run raspi-config in order to expand the filesystem to all SD card. Unfortunately raspi-config will ask us some silly question, because it could not determine the default user, but we can just press enter and that is it. Then you should select the option Advanced Options and finally Expand Filesystem.
After it is done, it will ask us to reboot, and we would willingly do that, of course.
Basic configuration of the operating system is now over.
PBX installation and configuration
After the reboot, we would need to remove the identity of the old SSH key on our computer (where from we are connecting to RasPBX). Why? Because in previous SSH session we issued regen-hostkeys command to create new SSH host keys, that’s why.
On my Ubuntu system I said: ssh-keygen -f "/home/matej/.ssh/known_hosts" -R "192.168.1.150", those using Windows systems need to figure this by yourself.
Now we can make a SSH connection to our RasPBX: ssh root@192.168.1.150.
Setting up e-mail system
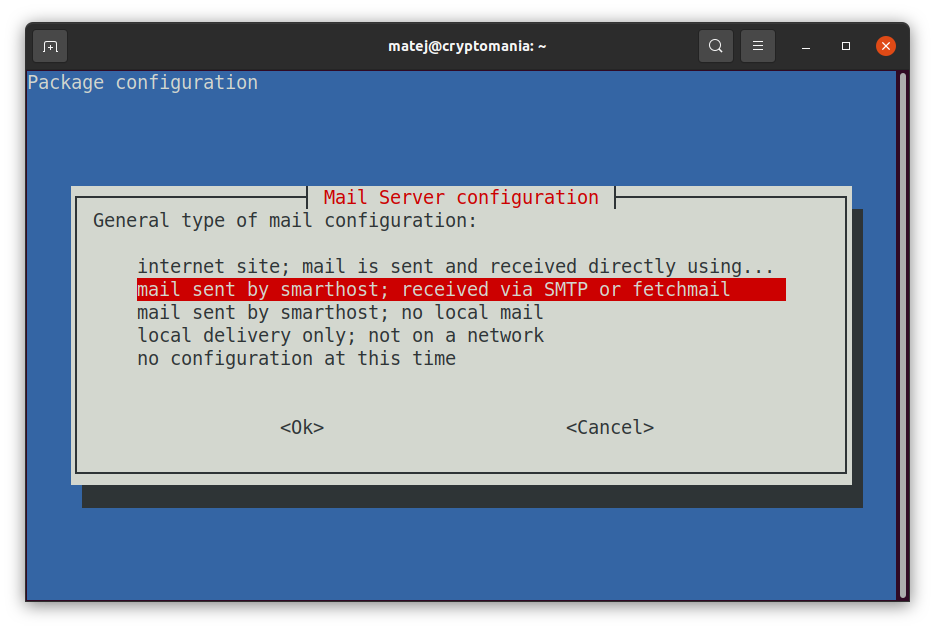
First, we will set up e-mail system, because our RasPBX is sending us and our users e-mails. Since RasPBX is using exim mail server, we should issue the following command: dpkg-reconfigure exim4-config.
Now we are guided through different settings. On the first configuration page se should select “mail sent by smarthost; received via SMTP or fetchmail”.
On the following pages we can just keep the default values by pressing enter. We keep doing so until we reach the page starting with the “Please enter the IP address or the host name of a mail server…” Here we need to enter the SMTP hostname of our email provider. Since I am also using my own mail server, I have entered settings of my mail server, but you can also use GMail or some other mail provider (preferably not one from the big evil tech companies).
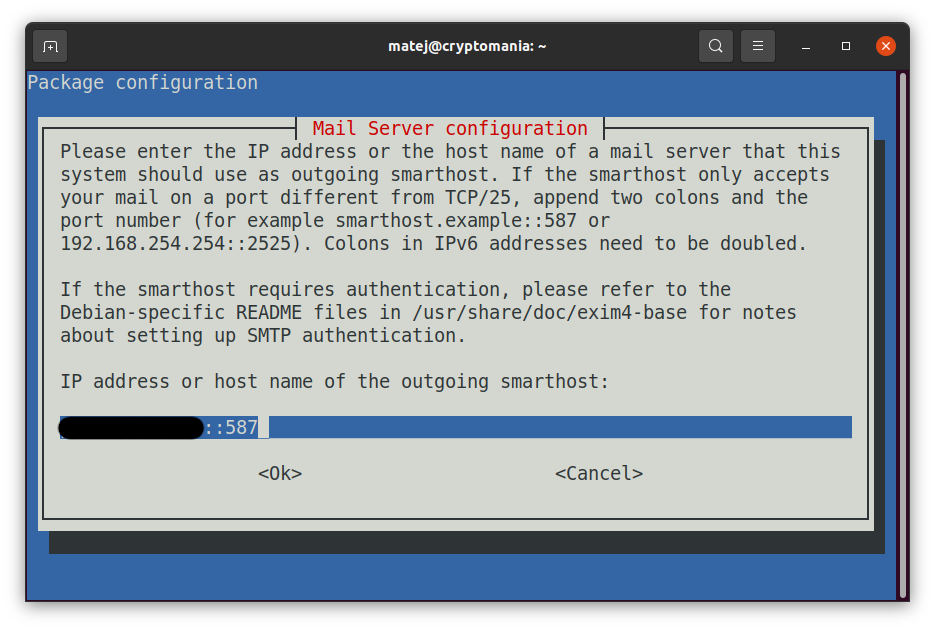
Anyway, here is a little trick: you need to enter the FQDN name and port of your mail server divided by double colon. For example: mail.myserver.si::587 - please note the double colon (::) between FQDN and the port. Oh, and for those non-hackers not knowing what FQDN stands for - it means fully qualified domain name, so it is basically a domain name that specifies location of your mail server exact location in the tree hierarchy of the Domain Name System.
Till the rest of the configuration, we can just keep accepting the default values.
In case you entered something stupid or forgot to set your e-mail provider’s server (as it happened to me…), just re-run the dpkg-reconfigure exim4-config command again.
Then, edit the file /etc/exim4/passwd.client. I am using nano text editor, but you can use your own favourite text editor. For those, not familiar with Linux, when you are done editing text file, you press ctrl-x, nano will ask you whether to save changes (“Save modified buffer?”) to which you of course say y (Yes), and then nano will ask you to which file changes should be saved, and you just press enter (to save the changes in currently opened file) and that is it.
So, we say: nano /etc/exim4/passwd.client
…and at the bottom of this file we add our credentials in the following format:
SMTP_HOSTNAME:USERNAME:PASSWORD
So in my case I entered:
mail.xxxxx.si:obvestilo@xxxxx.si:XXXYYYXXX
I have mentioned that I am from Slovenia, so I configured e-mail address obvestilo@..., which in English means notification@.... Because,… well, because RasPBX will be sending me notifications, right?
Please note that in most cases, the SMTP hostname used in this configuration file is identical to the hostname used as smarthost in exim4 configuration. If e-mail fails to work, specify the reverse lookup of your email provider’s SMTP host IP address here.
Also, some email providers require you to use sender addresses identical to one of the public email addresses of your account. In this case, edit file /etc/email-addresses with the command:
nano /etc/email-addresses
On the bottom of this file add:
root: obvestilo@xxxxx.si
asterisk: obvestilo@xxxxx.si
This configures the sender address of all outgoing e-mail to your e-mail address.
Now we configured everything, so we just need to activate our configuration with command: update-exim4.conf.
Now we can test if sending of e-mails is working. Enter the command: send_test_email matej.kovacic@xxxxx.si, hold your breath, and… a test e-mail should reach your inbox shortly.
After you receive the e-mail message saying “This is a test. If you can read this, email delivery from your Raspberry Pi works.”, you can grab your coffee. Or a beer, if you prefer. Now, it is a time for the next step.
Set up VPN client
As I mentioned, we will fence our RasPBX into a VPN network. In that case, RasPBX and VoIP clients (physical telephones and VoIP softphones) will be closed in a VPN network, so communications among them will take place inside a secured VPN network only. This is especially important if you do not set up TLS encryption and enforce SRTP and/or ZRTP encryption protocols. On the other hand, devices closed in a VPN network are usually easier to manage and more secure - if you can ensure security of a VPN network.
However, using VPN for encryption of a VoIP data could be a little problematic. Research has shown, that using encrypted VBR (variable bit rate) encoding could pose a security risk. Why? Because when using SRTP encryption with voice streams compressed using variable bit rate (VBR) codecs, the length of the compressed data packets depend on the characteristics of the speech signal. In other words, different sounds are encoded differently, and this small variations in packet sizes can be observed, and that could be used to reconstruct (“decrypt”) encrypted data. This may sound very academic, but the researchers have shown, that in specific circumstances phrases in a voice call could be recognised despite the encryption. (In short, researchers have shown that the lengths of encrypted VoIP packets can be used to identify the pre-recorded phrases spoken within a call.) So if you plan to do something really stupid (meaning: illegal) with your RasPBX, you should stop thinking about it right now.
However, closing VoIP data transfer into encrypted VPN tunnels is not a bad idea and the negative impact of using VBR codecs with VPN encryption should be minimal.
Anyway, let’s take a look into how connect RasPBX into the OpenVPN network. As I mentioned, I already have my OpenVPN server, so I will not cover that part, only how to install and configure OpenVPN client.
Which is in fact very easy. Just install openvpn package by apt install openvpn, and then copy the content of your OpenVPN configuration into the config file:
nano /etc/openvpn/myVPN_TCP.conf
(paste your config into that file, save and close it), and then you can run OpenVPN client with command: sudo systemctl start openvpn@myVPN_TCP.service.
When OpenVPN connection is established, you can check if it is working by entering: sudo systemctl status openvpn@myVPN_TCP.service. And of course, we would like that OpenVPN connection will be automatically established after reboot of your RasPBX device, so we must say: sudo systemctl enable openvpn@myVPN_TCP.service.
You may wonder why myVPN_TCP? It is just a name of my VPN connection, you can name it whatever you want.
Set up NTP
Next important thing is time. Correct time is important for VPN to work, but also for other services. Asterisk also only starts after time has been set correctly. RaspberryPi unfortunately do not have internal persistent hardware clock, however you can buy one as an hardware add-on. In any case, it is good to have correct (synchronized) time. Therefore on system boot, current time is obtained through NTP servers.
However, if internet connection is not continuously present or not present at all, this could lead to problems with time synchronisation. If internet connection is restored later, system can experience a large time jump. If Asterisk is started with wrong time first and time is properly set later, audio on calls can be seriously distorted. Also, in setups without internet connection Asterisk will not start by default.
And we do not want that, don’t we?
To overcome this problem, we need to install a package fake-hwclock, which saves the time on shutdown and loads it again on reboot. Additionally, we will install and set up continuous time synchronisation.
So first we say: apt install fake-hwclock. And then: apt install ntp. Then it is suggested to edit NTP config file with nano /etc/ntp.conf, and at the end of the file we should add:
server goodtime.ijs.si iburst
server ntp1.arnes.si iburst
server ntp2.arnes.si iburst
Well, I suggest you add your ISP’s or your local NTP servers, but since I am from Slovenia, I am using Slovenian famous NTP servers.
Then we can restart the NTP service: service ntp restart. Then we can check if time synchronisation is working by issuing ntpq -c lpeer and ntpq -p | egrep "^\*|jitter" commands (the latter will show us time deviation). Finally we would like that NTP is automatically started at reboot by issuing a command service ntp enable. And we can check the correct date and time by typing command date.
Security of your system
We have done a lot of things, but before we start installing the telephony part, we must take care of security of our RasPBX system. There are many important things, also in the telephony part, but for now, we will just take care of some basic stuff around SSH security and firewall. Please note that it is important to at least basically understand security considerations and mechanisms, if not, you can easily make a mistake or even lock yourself out of your system.
Secure SSH
Regarding SSH security, there are several good practices, but we will implement the following:
- disable empty passwords;
- disable .rhosts files (verification);
- specify supported HostKey algorithms, available KEX (Key Exchange) algorithms, ciphers allowed and available MAC (message authentication code) algorithms;
- set up login with SSH key instead of a password.
Disabling empty passwords: to explicitly disallow remote login from accounts with empty passwords, open the SSHd config file: nano /etc/ssh/sshd_config and add/enable the following line:
PermitEmptyPasswords no
Disabling .rhosts files: to prevent reading the user’s ~/.rhosts and ~/.shosts files, open the SSHd config file: nano /etc/ssh/sshd_config and add/enable the following line:
IgnoreRhosts yes
In the same file set supported HostKey algorithms by order of preference:
HostKey /etc/ssh/ssh_host_ed25519_key
HostKey /etc/ssh/ssh_host_rsa_key
HostKey /etc/ssh/ssh_host_ecdsa_key
Then specify the available KEX (Key Exchange) algorithms:
KexAlgorithms curve25519-sha256@libssh.org,ecdh-sha2-nistp521,ecdh-sha2-nistp384,ecdh-sha2-nistp256,diffie-hellman-group-exchange-sha256
Specify the allowed ciphers:
Ciphers chacha20-poly1305@openssh.com,aes256-gcm@openssh.com,aes128-gcm@openssh.com,aes256-ctr,aes192-ctr,aes128-ctr
Specify the available MAC (message authentication code) algorithms:
MACs hmac-sha2-512-etm@openssh.com,hmac-sha2-256-etm@openssh.com,umac-128-etm@openssh.com,hmac-sha2-512,hmac-sha2-256,umac-128@openssh.com
Login with SSH key
Finally, we will set up login with SSH key instead of with a password. Using SSH Keys for authentication is an very good way of securing your RasPBX device, because only someone with the private SSH key will be able to authenticate (login) to your system. Authentication with password means you identify yourself by entering a password, and usually people do not use long passwords, because it is hard to remember them. And many times people are recycling the passwords, which means they use the same or similar password for different systems.
On the other hand, authenticating with SSH keys means you are using public-key cryptography and a challenge-response authentication. Since a standard SSH key is usually 2048 characters long, it is much more complicated for attackers to perform brute force attack on your system.
So the first step is to generate an SSH key pair. Please note that private SSH key stays on your computer, while the public SSH key will go onto the RasPBX system.
Please also note, that SSH keys are generated on YOUR computer, not on RasPBX system!
Let’s start. In Linux generating SSH keypair is quite simple. In my Ubuntu I just run the command ssh-keygen, and follow the instructions. On Windows systems is a little bit more complicated, but not really painful. Open your favourite search engine and figure it out (hint: generating SSH keys with PuTTY).
Then you need to copy public SSH key to RasPBX device. Again, in my Linux I just typed the command: ssh-copy-id root@192.168.1.150, and followed the instructions:
/usr/bin/ssh-copy-id: INFO: attempting to log in with the new key(s), to filter out any that are already installed
/usr/bin/ssh-copy-id: INFO: 5 key(s) remain to be installed -- if you are prompted now it is to install the new keys
root@192.168.1.150's password:

Number of key(s) added: 5

Now try logging into the machine, with:   "ssh 'root@192.168.1.150'"
and check to make sure that only the key(s) you wanted were added.
On Windows… well, you know what to do.
After that, try to login to your RasPBX with key only (to see if everything works fine). If you did not made any mistake, you should be able to login smoothly.
And now the final step - disable password authentication on a RasPBX system completely, so only users with SSH keys will be able to login to you RasPBX. So, on your RasPBX run the command: nano /etc/ssh/sshd_config, and change the following values as described:
ChallengeResponseAuthentication no
PasswordAuthentication no
UsePAM no
When you are finished, you should test SSH config with a command: sshd -t, or even run some more extended test: sshd -T.
If everything is OK, you should restart SSH with: systemctl restart ssh.
Now you can check if everything is working, so log out and try to login again. If you are in, you are good. If not… well you are in a little trouble, but nothing that a true hacker will be unable to solve. Just connect monitor and a keyboard to your RasPBX and fix what you have done wrong.
Disable root user
A good security practice is also to disable root user and especially to disable SSH for root user.
To do that, we need to create a new user, let’s say matej. So we say: adduser matej and answer some questions:
Adding user 'matej' ...
Adding new group 'matej' (1001) ...
Adding new user 'matej' (1001) with group 'matej' ...
Creating home directory '/home/matej' ...
Copying files from '/etc/skel' ...
New password:
Retype new password:
passwd: password updated successfully
Changing the user information for matej
Enter the new value, or press ENTER for the default
    Full Name []: Matej Kovacic
    Room Number []:
    Work Phone []:
    Home Phone []:
    Other []:
Is the information correct? [Y/n]
Then we add this user to sudo group: usermod -aG sudo matej. Sudo is a program that enables Linux users to run programs with the security privileges of another user, by default the superuser (root or admin, if you prefer).
Now we try to login to the system as matej: su - matej. Now we can check which is the effective username of the current user by issuing a command whoami. We will see that our username is matej (which is obvious).
But if we say: sudo whoami, we will be asked for our password and we will see that we are recognized as a root.
Now we need to copy our SSH keys to user matej. So we first need to became a root with sudo su and then open SSH configuration file: nano /etc/ssh/sshd_config and change the following values as described:
ChallengeResponseAuthentication yes
PasswordAuthentication yes
UsePAM yes
Then we restart SSH: systemctl restart ssh and from our computer copy our public SSH key to user matej on RasPBX (not root!): ssh-copy-id matej@192.168.1.150.
Check that we are able to SSH, go back to OpenSSH configuration (nano /etc/ssh/sshd_config) and change the settings back:
ChallengeResponseAuthentication no
PasswordAuthentication no
UsePAM no
Now, before closing the file, we will also disable login for root user. We can do this by changing the PermitRootLogin variable to no:
PermitRootLogin no
Save the file, restart SSH (systemctl restart ssh) and you are done.
Now you can login to your RasPBX device with ssh matej@192.168.1.150 (no root login anymore) and after successfull login you will need to enter sudo su to become root.
Install intrusion prevention
For a firewall we will first install fail2ban, which is an intrusion prevention software framework that protects computer servers from brute-force attacks. To put it simply - if someone tries to login to your system several times by guessing the correct password, fail2ban will detect this and block his IP for some time.
The actual script is located in /usr/bin/install-fail2ban, and we can see that if IP fails to login to our system 3 times in a row (maxretry = 3), it is banned for half an hour (bantime = 1800) out of a system. So if some stupid hacker is trying to guess the correct password, he will be able to perform only three guesses, and then he will be locked out of our system for 30 minutes before he will be able to try another three guesses. Which means he could perform mostly 144 guesses a day.
So a word of advice: use long and complex passwords. And check security logs regulary. Asterisk security logs are located in a file /var/log/asterisk/security_log. Use cat, grep and other fine Linux tools to check it.
Actually, this sounds quite nice, but nobody, and I mean nobody is really checking security logs. Even if they should. That’s why you should configure fail2ban for sending you important notifications to your e-mail address. Check your logs will than mean “read (and understand) your e-mail”. Which is much more simple thing to do.
So, let’s install fail2ban tool. It is simple, just type install-fail2ban and answer the questions. Basically, you would want that system will be sending you notifications to your e-mail address, so enter it when asked. And at the end you will be asked if the install script should overwrite /etc/fail2ban/filter.d/asterisk.conf file, and you can say y (yes).
There are also some others things you need to do for securing your Asterisk system, but we will return to that a little bit later. But the most important thing is, that this fail2ban configuration works only if you have setting not to allow SIP guest to connect to your Asterisk system! We will configure that later.
How to unban IP address
So, you set up fail2ban, everything is working fine, but you made a mistake and entered the wrong password to one of your VoIP clients. VoIP client is trying to login to your system, and after three unsuccessful attempts, you receive an e-mail informing you that “The IP 10.10.8.9 has just been banned by Fail2Ban after 3 attempts against Asterisk.”.
One simple thing you can do is to wait for half an hour. It is always time for a good coffee, so grab one and drink it slowly.
However, if you are in a little bit of hurry, you can unban the banned IP. First, you can check fail2ban status by typing fail2ban-client status:
Status
|- Number of jail:	2
`- Jail list:	asterisk, sshd
Here you can see, we have two jails, one is named asterisk and the other sshd. So let’s check asterisk jail. fail2ban-client status asterisk will show you who is banned:
Status for the jail: asterisk
|- Filter
|  |- Currently failed:	0
|  |- Total failed:	3
|  `- File list:	/var/log/asterisk/security_log
`- Actions
   |- Currently banned:	1
   |- Total banned:	1
   `- Banned IP list:	10.10.8.9
Now you can manually unban this IP address: fail2ban-client set asterisk unbanip 10.10.8.9. However, if user on this IP address is naughty (and not banned yet), you can also manually ban him with: fail2ban-client set asterisk banip 10.10.8.9.
Install firewall
The final step for now will the installation of firewall. We will install ufw, which stands for uncomplicated firewall. The key word here is “uncomplicated”, but if you are not familiar with Linux networking, it will look quite complicated to you. However, the term uncomplicated is relative - just look to another Linux firewall tool, iptables, and you will quickly see that ufw in fact is - uncomplicated.
So, let’s install ufw by typing the command: apt install ufw.
Now it is a time to set up some rules. First, we will deny all incoming connections, and allow all outgoing connections:
ufw default deny incoming
ufw default allow outgoing
Wait, what? How we will be able to call then, if incoming connections are not allowed???
Hold your horses! This is just a general rule, and later we are going to define special rules allowing users to connect to our RasPBX. Actually, let’s do this right now. So my rules are the following:
- allow all connections from VPN networking (so VoIP clients will be able to connect to my system only from VPN);
- from other networks (including my local network) allow only SSH connections to the system (this will allow me to perform basic management of the system from local network, in case VPN goes down);
- web management is available only from VPN from a specific IP address (so other VPN users will not be able to login to web management interface).
But first, let’s take a look at my network setup.
My local network is in range 192.168.1.0/24, which means I can use IP addresses from 192.168.1.1 to 192.168.1.254 (192.168.1.0 is the network ID, and 192.168.1.255 is the broadcast address for the network). My RasPBX device has local IP 192.168.1.150.
But I am also using VPN (in range 10.10.8.0/24), and my RasPBX device has VPN IP address 10.10.8.150. In my VPN network there are several other devices, and I want that RasPBX web management will be accessible from 10.10.8.10.
Therefore we will set up the firewall the following way:
- first we will allow SSH connections from anywhere (SSH is running on TCP port 22):
ufw allow 22/tcp; - then we will allow web management from my computer, but only if it is connected to VPN (my VPN IP si 10.10.8.10):
ufw allow from 10.10.8.10 to any port 80 proto tcp; - then we will block connections to web interface for all others:
ufw deny to any port 80 proto tcp; - finally we will allow all (other) connections from the VPN network:
ufw allow from 10.10.8.0/24 to any.
When we enter all these commands, we can enable ufw by typing ufw enable. We can also list the firewall rules: ufw status numbered and then delete rules we do not want any more with ufw delete [number]. Here is example from my device:
     To                         Action      From
     --                         ------      ----
[ 1] 22/tcp                     ALLOW IN    Anywhere
[ 2] 80/tcp                     ALLOW IN    10.10.8.10
[ 3] 80/tcp                     DENY IN     Anywhere
[ 4] Anywhere                   ALLOW IN    10.10.8.0/24
[ 5] 22/tcp (v6)                ALLOW IN    Anywhere (v6)
[ 6] 80/tcp (v6)                DENY IN     Anywhere (v6)
Useful commands are also ufw disable and ufw reset, for more just check the UFW documentation.
Now we are done. Just check if everything is working by completely logging out and logging in again, and if you are able to connect from your local network (ssh root@192.168.1.150) and through VPN (ssh root@10.10.8.150), grab a cup of coffee - you deserved it well.
Installation of USB dongle
Finally, the real thing. The reason why you decided to read all this stuff. Fulfilment of your desires. Let’s install USB dongle and let the freedom call!
So, you have your SIM card PIN deactivated, you also have your compatible modem with the latest firmware installed and voice enabled. Now you can finally run this desired command: install-dongle.
First you have to enter the phone number of your SIM card (the one inserted in USB dongle). I am not going to tell you my phone number, so let’s pretend it is +38641234567. So I entered +38641234567.
As you noticed, you need to enter phone number in E.164 international standard for phone number format. In my case 386 is country code for Slovenia, 41 is area code, and 234567 is phone number. More about telephone numbers in Slovenia you can read on Wikipedia.
Then you need to enter e-mail address for sending incoming SMS messages (I entered my e-mail address), phone number to which incoming SMS messages should be forwarded (I left this empty, because I do not want to use SMS forwarding), and finally the script asked me if I want to install a webpage (on RasPBX) for sending SMS with my USB dongle. Of course I want, what a stupid question, so I said y (Yes) and then entered password for SMS page, which would be mytotallysecurepassword. Nah, I am joking, I am not sharing that with you.
Regarding this webpage on RasPBX for sending SMS messages. If you are a web designer, it could look really insulting for your eyes. But this is not a problem, because you can change the outlook of SMS sending page. HTML files are located in /var/www/html/sms and you can edit them freely. If you managed to put together some likeble webpage, it would be much appreciated if you can share it with me.
Now you can insert your USB dongle into your RaspberryPi. If it was already connected before, unplug it and plug it in again. However, some older modems require a complete reboot of the RaspberryPi, so you can just do that by typing reboot.
Dongle configuration
After SSH-ing back again, you can check if you can see USB dongle connected to your RaspberryPi. Type ls -l /dev/ttyUSB0*, and you will see something like:
crw-rw-rw- 1 root dialout 188, 0 okt 29 15:27 /dev/ttyUSB0
Now show dongle devices through Asterisk management console: asterisk -rx 'dongle show devices'. You will see something like this:
ID           Group State      RSSI Mode Submode Provider Name  Model      Firmware          IMEI             IMSI             Number
dongle0      0     Free       21   3    3       BOB            E1752      11.126.03.01.314  xxxxxxxxxxxxxxx  2934xxxxxxxxxxx  Unknown
You can see you have one USB dongle inserted (called dongle0), and several interesting info about that dongle, like IMEI, IMSI of your SIM card, etc. State: Free means that USB dongle is ready to accept calls. And if you are wondering if dongle0 means there could also be dongle1, etc., the answer is yes, you can connect several dongles to your RaspberryPi (but note that you will need more power supply to power them).
Let’s get some more information about your dongle (dongle0). Type asterisk -rx 'dongle show device state dongle0' and you will get a lot of interesting information:
-------------- Status -------------
  Device                  : dongle0
  State                   : Free
  Audio                   : /dev/ttyUSB1
  Data                    : /dev/ttyUSB2
  Voice                   : Yes
  SMS                     : Yes
  Manufacturer            : huawei
  Model                   : E1752
  Firmware                : 11.126.03.01.314
  IMEI                    : xxxxxxxxxxxxxxx
  IMSI                    : 2934xxxxxxxxxxx
  GSM Registration Status : Registered, home network
  RSSI                    : 21, -71 dBm
  Mode                    : GSM/GPRS
  Submode                 : EDGE
  Provider Name           : BOB
  Location area code      : xxx
  Cell ID                 : xxx
  Subscriber Number       : Unknown
  SMS Service Center      : +38640441000
  Use UCS-2 encoding      : Yes
  USSD use 7 bit encoding : Yes
  USSD use UCS-2 decoding : No
  Tasks in queue          : 0
  Commands in queue       : 0
  Call Waiting            : Disabled
  Current device state    : start
  Desired device state    : start
  When change state       : now
  Calls/Channels          : 0
    Active                : 0
    Held                  : 0
    Dialing               : 0
    Alerting              : 0
    Incoming              : 0
    Waiting               : 0
    Releasing             : 0
    Initializing          : 0
Since I like to preserve my privacy, I am not disclosing my IMEI, IMSI, LAC code and Cell ID.
Now we can configure our dongle for calls and SMS messages. Open the config file: nano /etc/asterisk/dongle.conf and look for [dongle0]. You will see audio and data lines, and after that just add your exten, imei and imsi lines as in the following example:
[dongle0]
audio=/dev/ttyUSB1              ; tty port for audio connection;        no default value
data=/dev/ttyUSB2               ; tty port for AT commands;             no default value
exten=+38641234567;
imei=xxxxxxxxxxxxxxx;
imsi=2934xxxxxxxxxxx;
Save and close the file and login directly to Asterisk management console: asterisk -rvvv. Then type dongle reload now:
raspbx*CLI> dongle reload now
[2021-10-29 17:23:11] NOTICE[1421]: chan_dongle.c:429 do_monitor_phone: [dongle0] stopping by restart request
    -- [dongle0] Dongle has disconnected
    -- [dongle0] Trying to connect on /dev/ttyUSB2...
    -- [dongle0] Dongle has connected, initializing...
    -- [dongle0] Dongle initialized and ready
Freedom is calling
As you can see, USB dongle is now ready. So let’s check if we can send SMS message. In Asterisk management console type dongle sms dongle0 +38640XXXXXX Test!. This will send a SMS message to my personal mobile (+38640XXXXXX), with text “Test!.
We can also check outgoing call by typing channel originate dongle/dongle0/+38640XXXXXX application MusicOnHold. In Asterisk management console you will see something like:
-- Called dongle0/+38640XXXXXX
-- Dongle/dongle0-0100000000 is making progress
-- Dongle/dongle0-0100000000 answered
-- Started music on hold, class 'default', on channel 'Dongle/dongle0-0100000000'
-- Stopped music on hold on Dongle/dongle0-0100000000
The called phone will start ringing and if you pick up, you will hear some music.
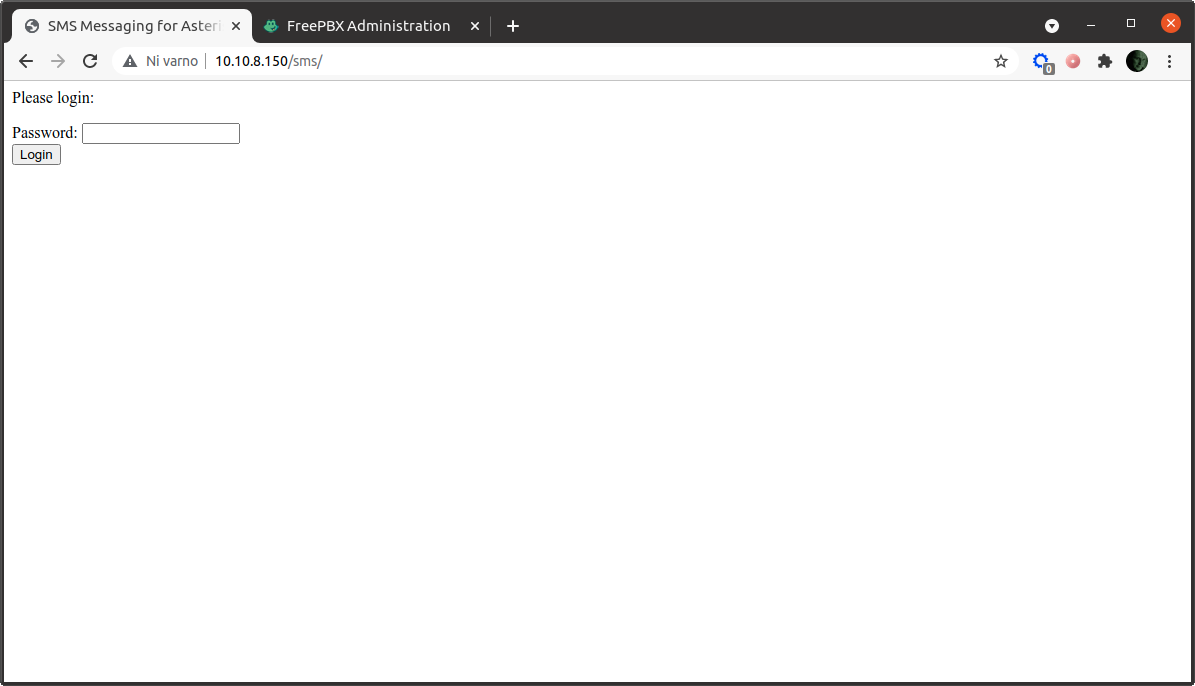
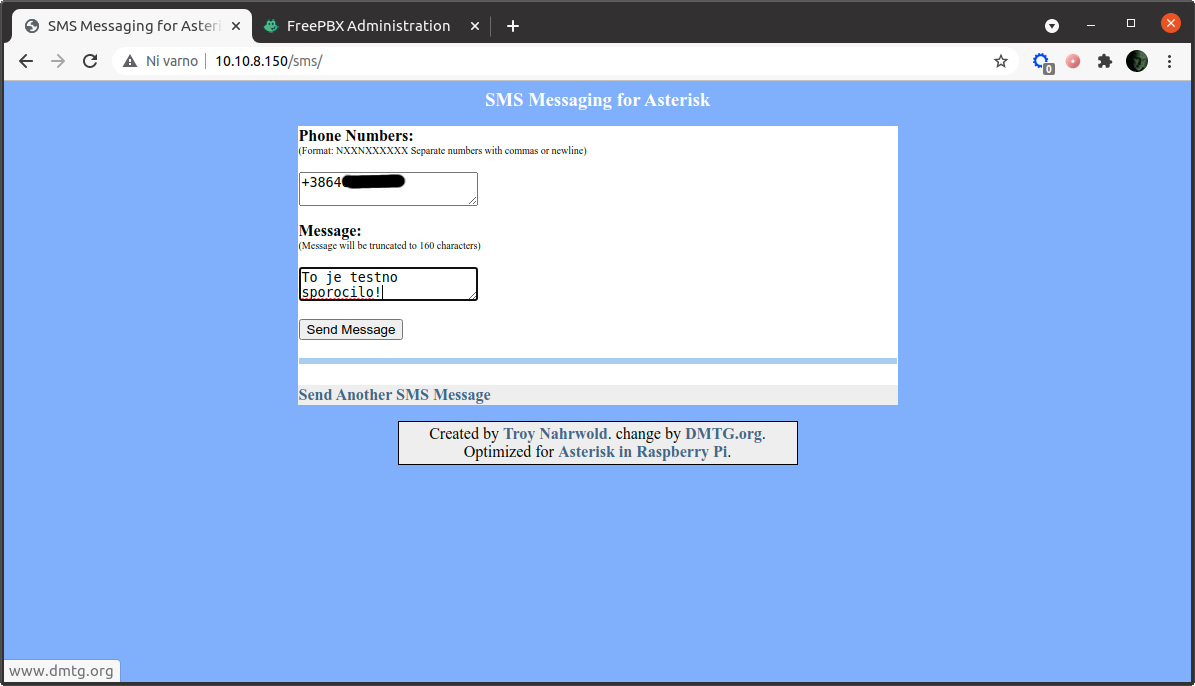
Now you can close Asterisk management console by typing exit, and try to send SMS through webpage. In your browser you can open /sms webpage on your RasPBX device (in my case http://10.10.8.150/sms/) and send the SMS message. If you remember, we set up firewall, so webpage for SMS sending is available only from allowed IP addresses.
Oh, almost forgot. If you send SMS back to your USB dongle, SMS is received and RasPBX instantly send it to your e-mail address. How cool is that, ha?
Unfortunately, receiving MMS messages does not work (and sending also not). When someone will send you a MMS message, you will even not receive the sending number, just a message, that you received SMS from number MMSC with empty content. If you have any idea how to solve that, you are wellcome to share it with rest of us.
Anyway, e-mail message with received SMS looks really poor, so you can enter nano /etc/asterisk/extensions_custom.conf and add something like:
[from-trunk-dongle]
exten => sms,1,Verbose(Incoming SMS from ${CALLERID(num)} ${BASE64_DECODE(${SMS_BASE64})})
exten => sms,n,System(echo "To: matej.kovacic@xxxxx.si\nSubject: Incoming SMS from ${CALLERID(num)}\n\nHi,\n\non a nice day of ${STRFTIME(${EPOCH},,%d. %m. %Y at %H:%M:%S)} you have received SMS from number ${CALLERID(num)}.\n\nSMS content:\n " > /tmp/sms.txt)
exten => sms,n,Set(FILE(/tmp/sms.txt,,,a)=${BASE64_DECODE(${SMS_BASE64})})
exten => sms,n,System(sendmail -t < /tmp/sms.txt)
exten => sms,n,Hangup()
exten => _.,1,Set(CALLERID(name)=${CALLERID(num)})
exten => _.,n,Goto(from-trunk,${EXTEN},1)
Just be careful to enter your correct e-mail address.
Install USSD webpage
Unstructured Supplementary Service Data (USSD), sometimes also called quick codes or feature codes, is a communications protocol used by GSM cellular telephones to communicate with the mobile network operator’s computers. USSD can be used for WAP browsing, prepaid callback service, mobile-money services, location-based content services, menu-based information services or as part of configuring the phone on the network. USSD messages are up to 182 alphanumeric characters long, but unlike SMS messages, USSD messages create a real-time connection during a USSD session. The connection remains open, allowing a two-way exchange of a sequence of data.
I am not using USSD, but if case you do, just type the command apt install ussd-webpage, and after that you can browse to /ussd webpage of your RasPBX (in my case http://10.10.8.150/ussd/).
Install additional codec
You may also like to install additional voice codec G.729, which is licensed and needs to be included into your system manually. G.729 is compressed and it uses less bandwidth at the cost of some sound quality, though it is still more than good enough for most calls. It offers very good trade-off between bandwidth and quality. For instance, standard G.711 calls take 64kbit/s per call, but the G.729 codec compresses the voice to 8kbit/s, which gives you up to eight times more capacity on the same connection. This is ideal for use f your bandwidth is limited. You can install the codec by typing apt install asterisk16-codecg729.
And that is it. You can let the console some rest for now.
FreePBX configuration
Now the fun begins. Open your web browser and type the IP address of your RasPBX. In my case http://10.10.8.150.
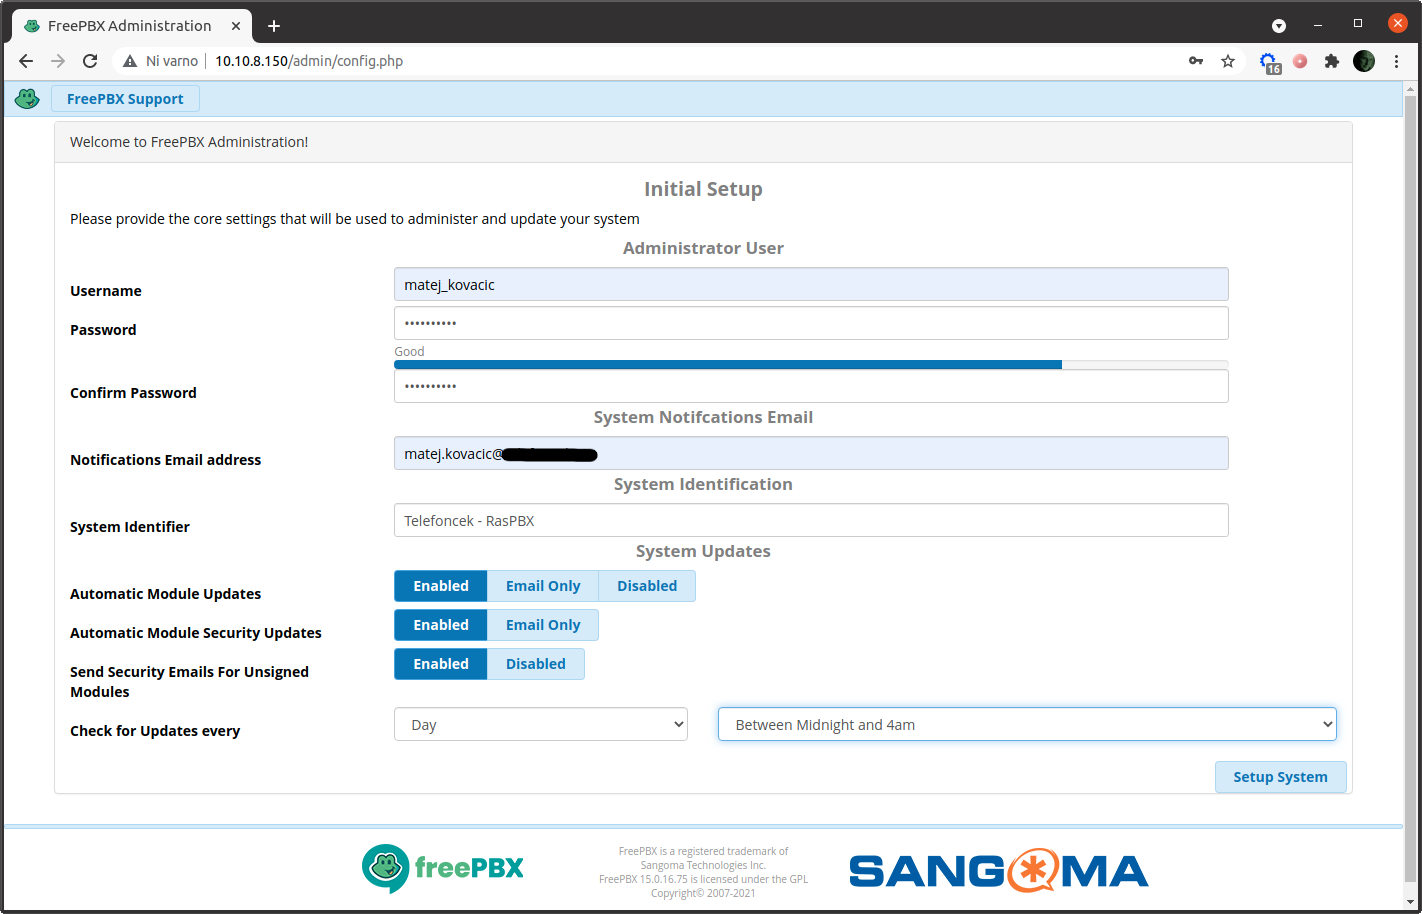
When we are trying to login to the FreePBX web interface for the first time, initial setup will be performed. Here we need to set default language. I strongly suggest you to select English, because if you need help on forums and browse the documentation, everything is mostly in English. You will also need to setup your time zone, and of course username and a password. And don’t forget notification e-mail. I also strongly suggest you to enable automatic updates.
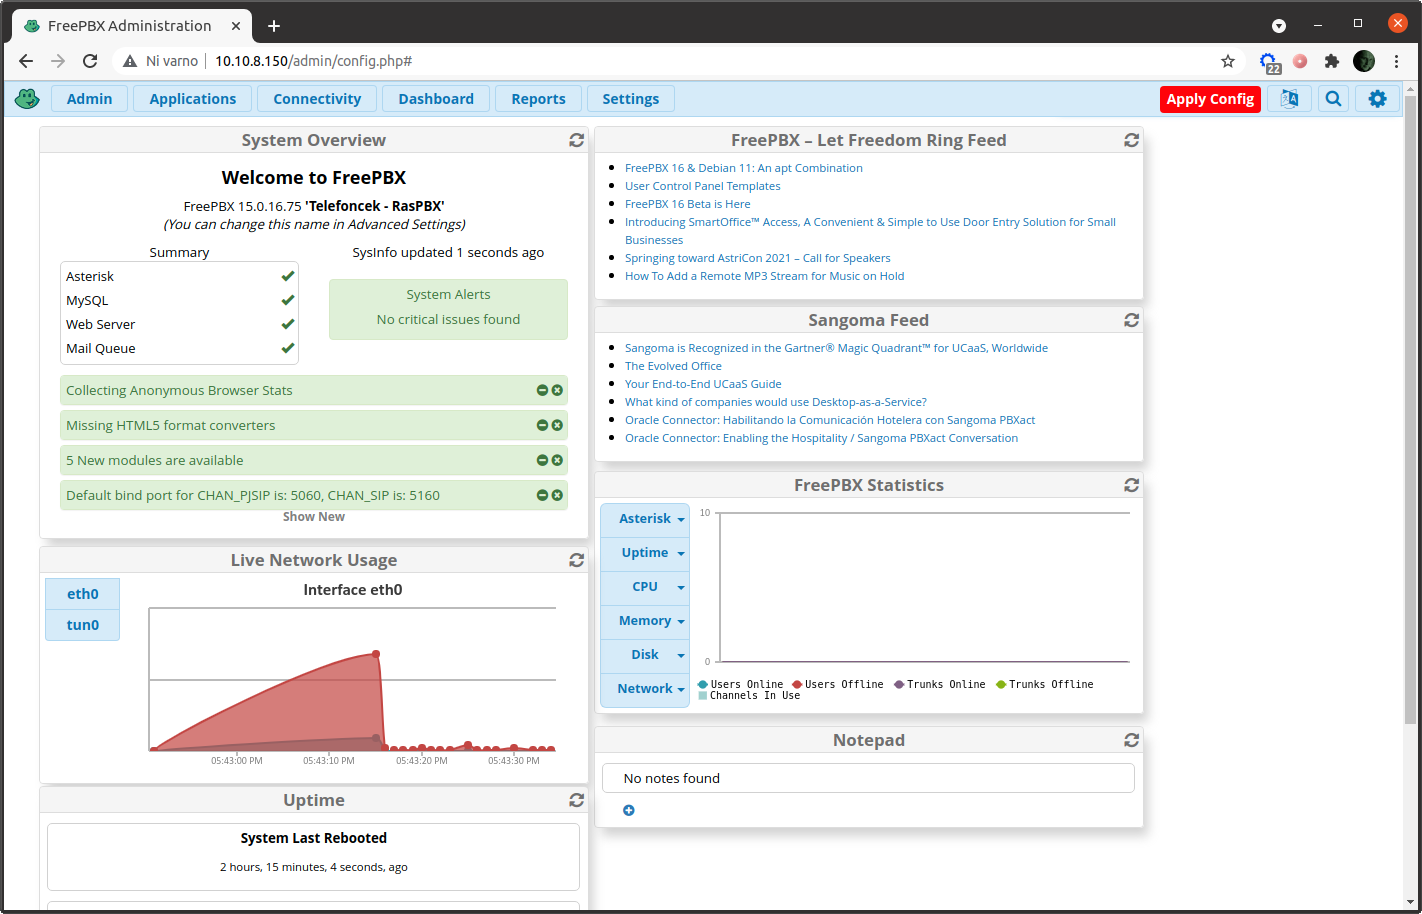
After successfull login to dashboard we need to apply the config. Now our system is ready for further settings.
Set up the trunk
As I have explained, trunking is used to connect two systems together. With our trunk, we will connect our RasPBX system with our mobile operator through our USB dongle. From that trunk we will later route outgoing and incoming calls between our system and a public telephone network.
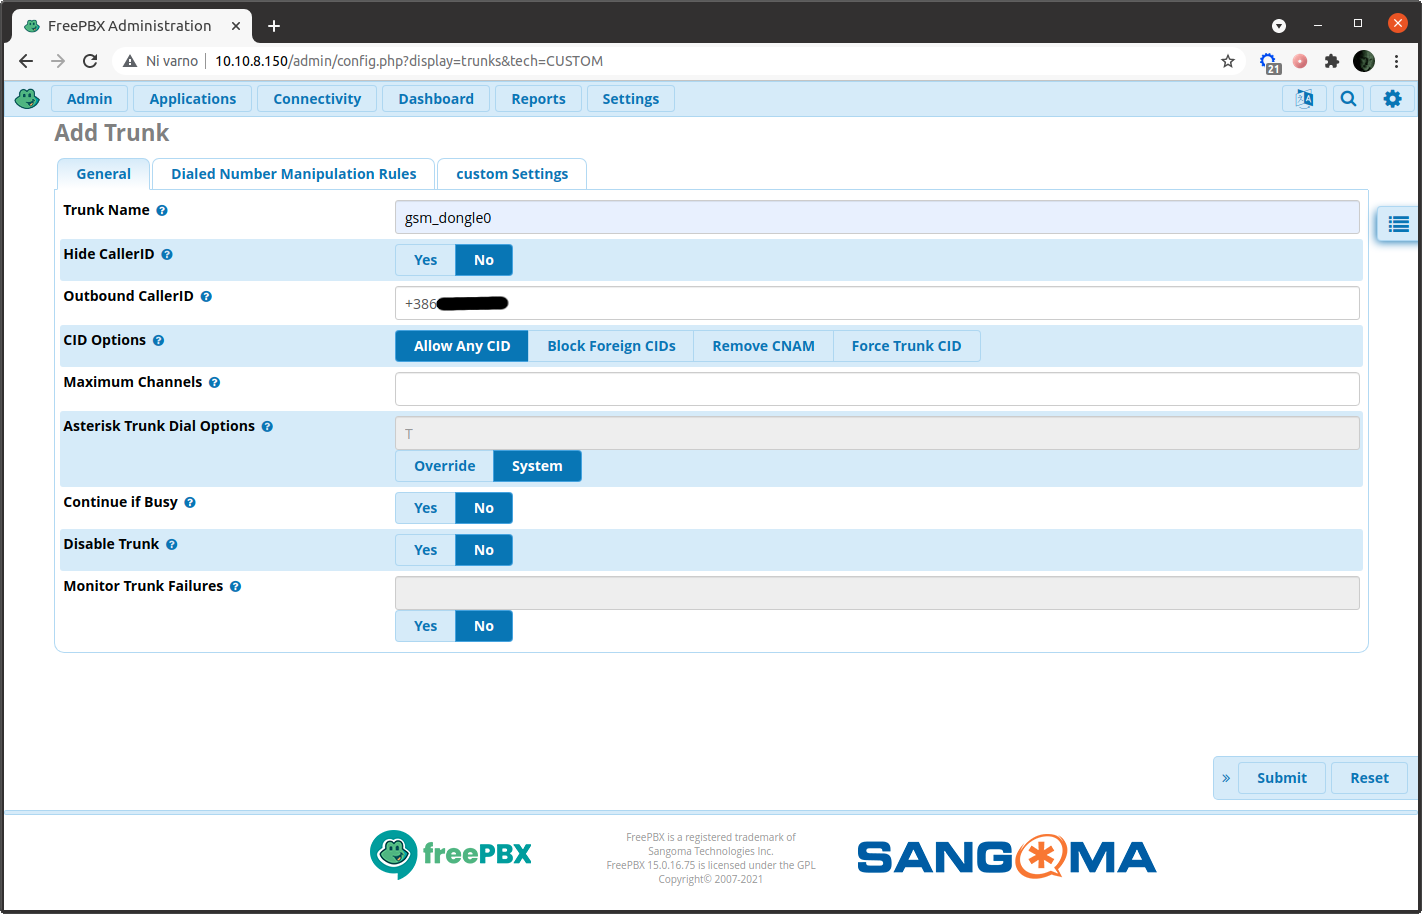
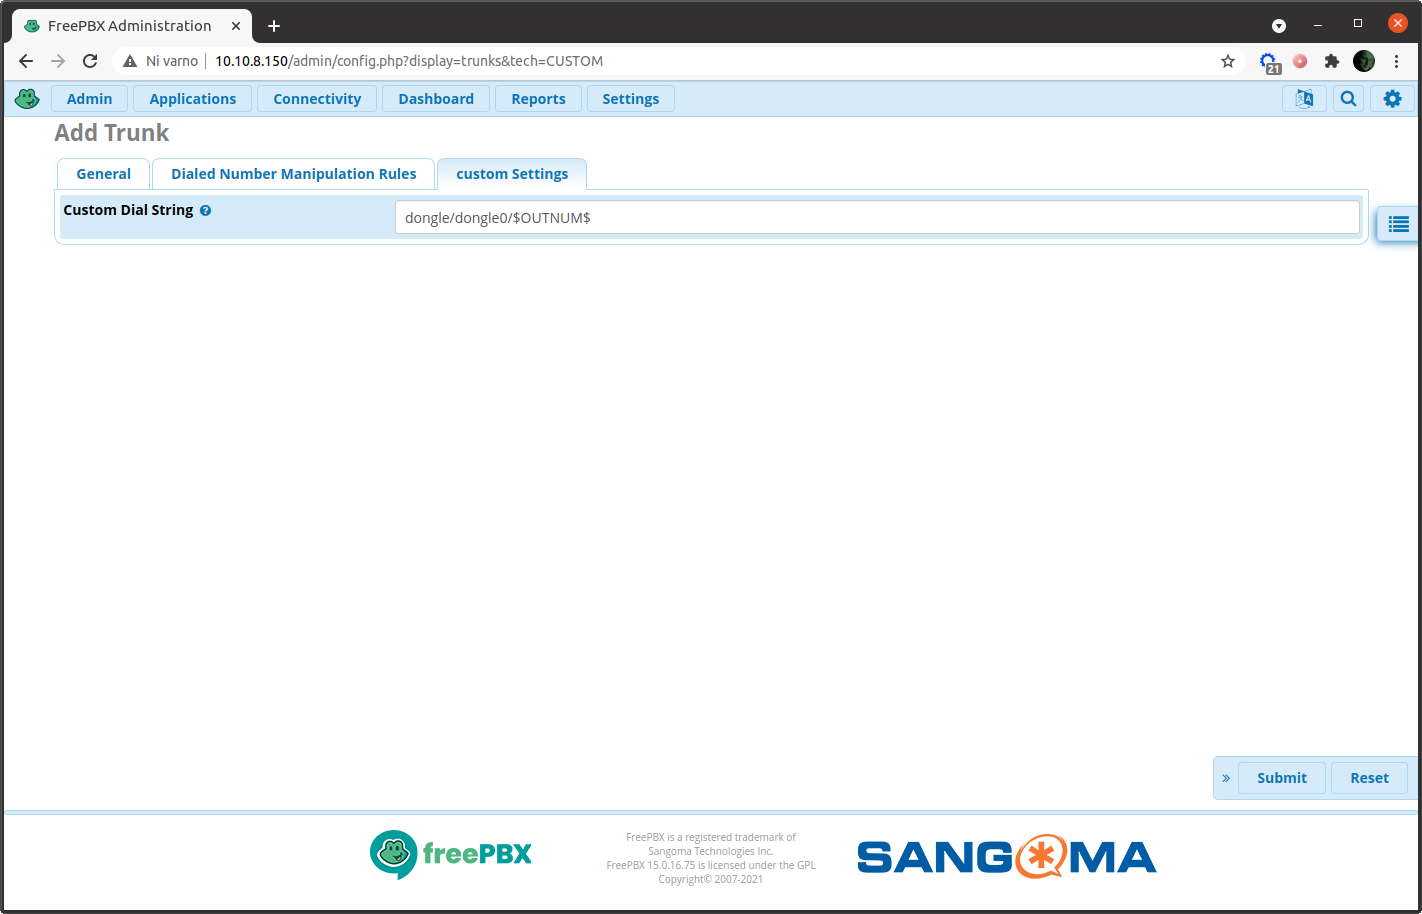
So we first need to setup a new custom trunk for our dongle. In FreePBX web interface go to under Connectivity → Trunks → Add Custom Trunk and set these values:
General-Trunk Name: enter the name of your trunk, I usedgsm_dongle0.General-Outbound CallerID: enter the telephone number of your SIM card in USB dongle in E.164 format. I entered+38640XXXXXX(well, not really with x-es, because I want to keep my phone number for myself, but you got the point).Dialed Number Manipulation Rules: here go to the fieldmatch patternand enterXXXXXXXXX.Custom Settings-Custom Dial String:dongle/dongle0/$OUTNUM$.

Submit changes (button down on the right) and then click to Apply config (upper right corner).
Now, before we continue, a little, but useful explanation regarding dialed number manipulation rules (in my case XXXXXXXXX). What does it mean anyway?
Under the trunk options, you can set rules to manipulate the dialed number before sending it out of the trunk. That means that you can add prefixes, etc. to the dialed number, before it is sent to the trunk. For instance, if user calls number 123456, you can add 041 before that number, so the dialed number would be 041123456. If no rule applies, the number is not changed. In our case we will not be applying any rules to the dialed numbers. However, we require that dialed numbers are 9 digits long, hence we used the pattern XXXXXXXXX.
BTW, if you go to Dialed Number Manipulation Rules and to the field prepend, you can enter a number that will be added in front of the called number. For instance, if you enter #31#, this will hide Caller ID on your trunk (this code is used in Europe for hiding Caller ID).
Anyway, what about the X-es? These are patterns used to “interpret” the number:
- X matches any digit from 0-9.
- Z matches any digit from 1-9.
- N matches any digit from 2-9.
- [1237-9] matches any digit in the brackets (in our case it matches numbers: 1,2,3,7,8,9).
- . dot matches one or more dialed digits.
So the rule XXXXXXXXX simply means you can call any 9-digits long number from 000000000 to 999999999 through this trunk.
Now you are probably thinking, that with these rules, you can restrict numbers that may be dialed. So you could restrict which numbers people using your PBX can dial and which not?
Yes, you are correct. You can do that, but on outbound routes settings. And this is what we are going to explain right now.
Set up outbound routes
The outbound routes are used to tell your RasPBX system which numbers your phones are permitted to call and which trunk to send the calls to. Here you can set the numbers that can never be dialed, which is an emergency route (we are not going to cover this in this guide), and a route for ordinary calls. There could also be some special routes for international calls, or calls to different networks (for instance some operators are offering unlimited free calls inside their network).
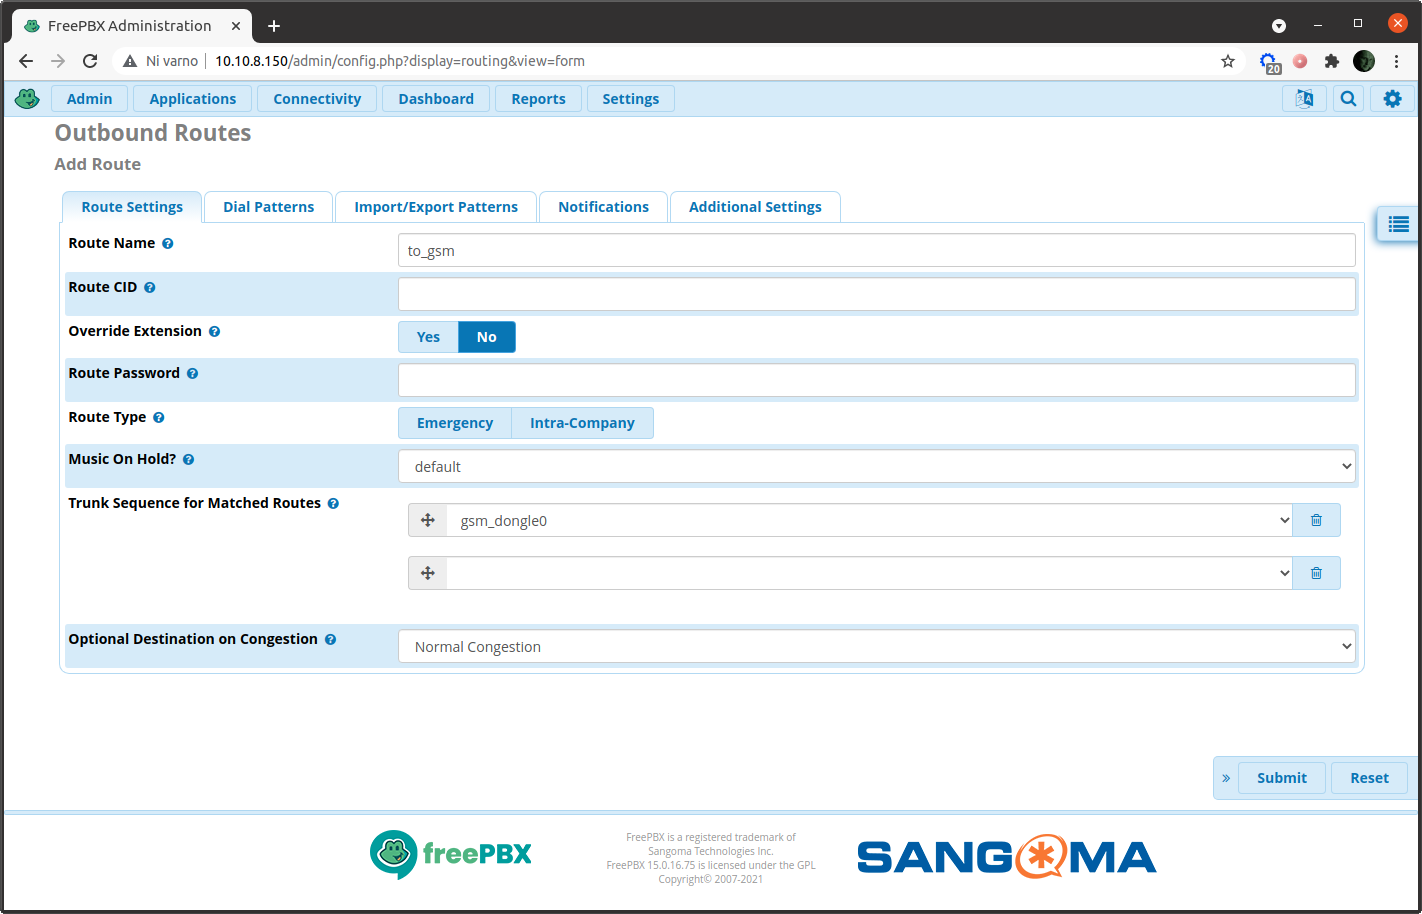
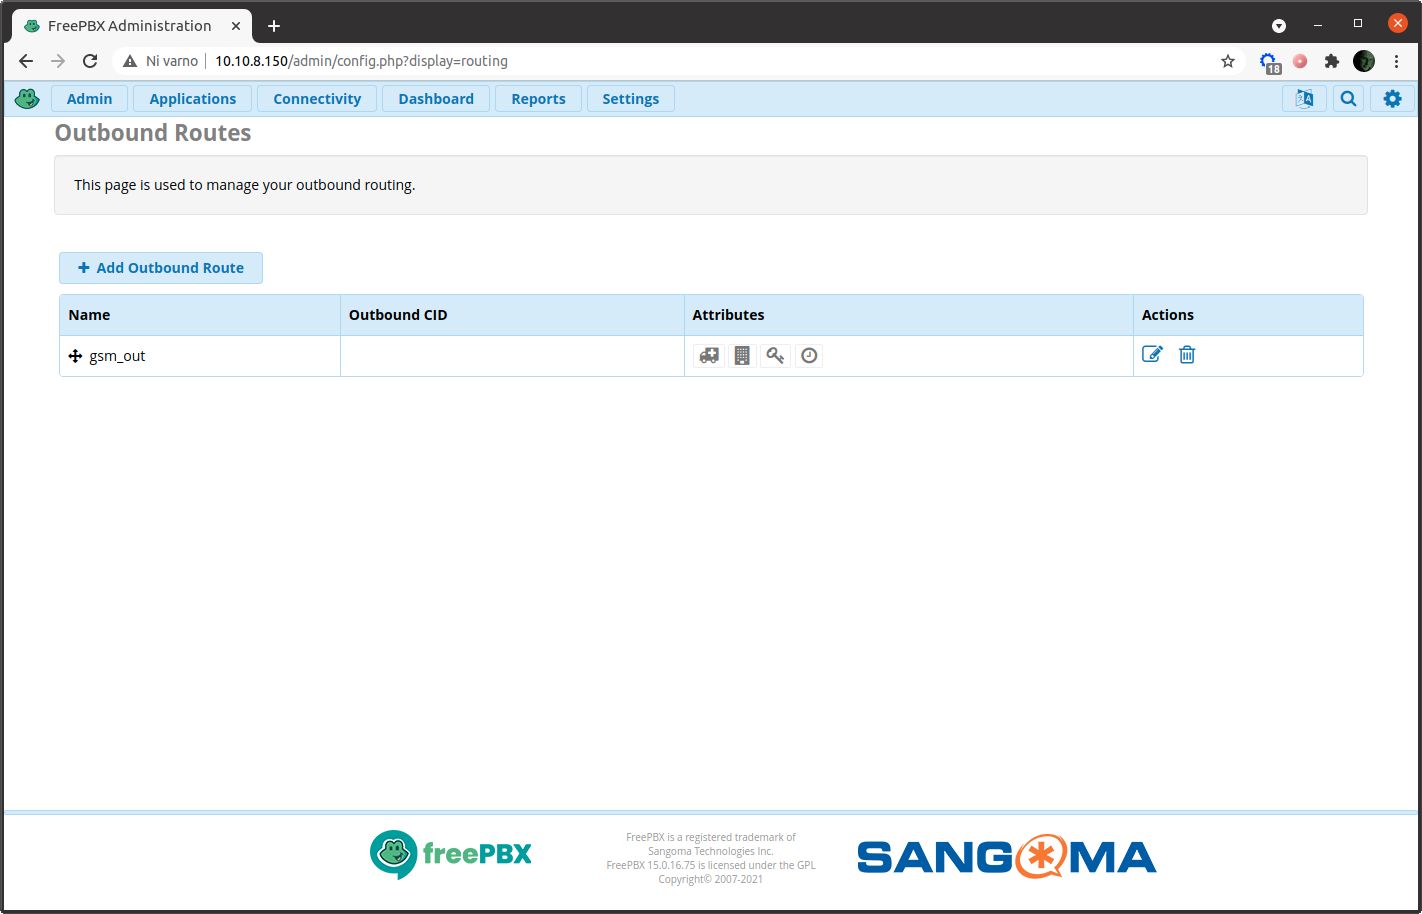
So, we will set up the outgoing connection, that you will be able to call outside. In FreePBX click Connectivity → Outbound routes and click on a button Add Outbound Route. Now you should configure your outbound route:
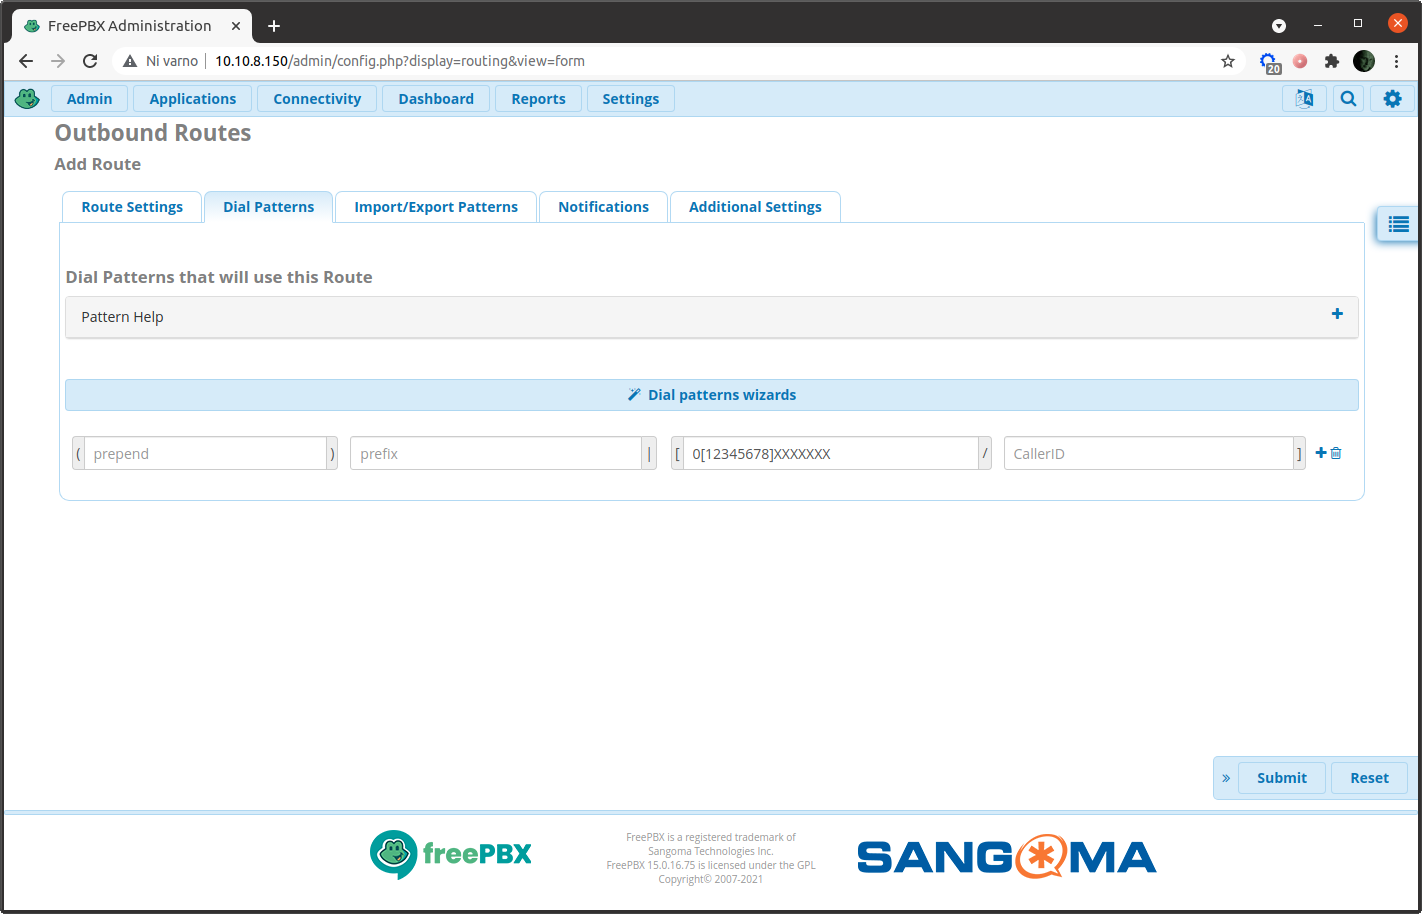
Route Name: enter the name of your outbound route, I usedgsm_out.Trunk Sequence for Matched Route: from the drop down menu selectgsm_dongle0(this is the name of our trunk we defined before).Dial Patterns: here go to the fieldmatch patternand enter0[12345678]XXXXXXX.
This pattern will restrict user to be able to call only 9-digit numbers starting with 0 and followed with second digit, which could be any digit except 0 or 9. All other seven digits could be anything fro 0 to 9.
What does this rule means? Basically no international calls, and calling only to local networks from 01 to 08. 090 network is not allowed, because 090 numbers in Slovenia are commercial numbers where you can call fortune tellers, hot lines and other stupid things, and these calls could be very expensive.
Anyway, click Submit changes and then Apply config.
Setting up dial prefix for outgoing calls
If you want that for outside dialing (using your outbound route) user have to enter a specific number, for instance 0, go to your outbound route setting and select Dial Patterns. Go to the field prefix and enter 0.
So when some local number (extension) would like to call outside number 031987654, it should then dial 0, 031987654. Without that, outside calling will not be possible.
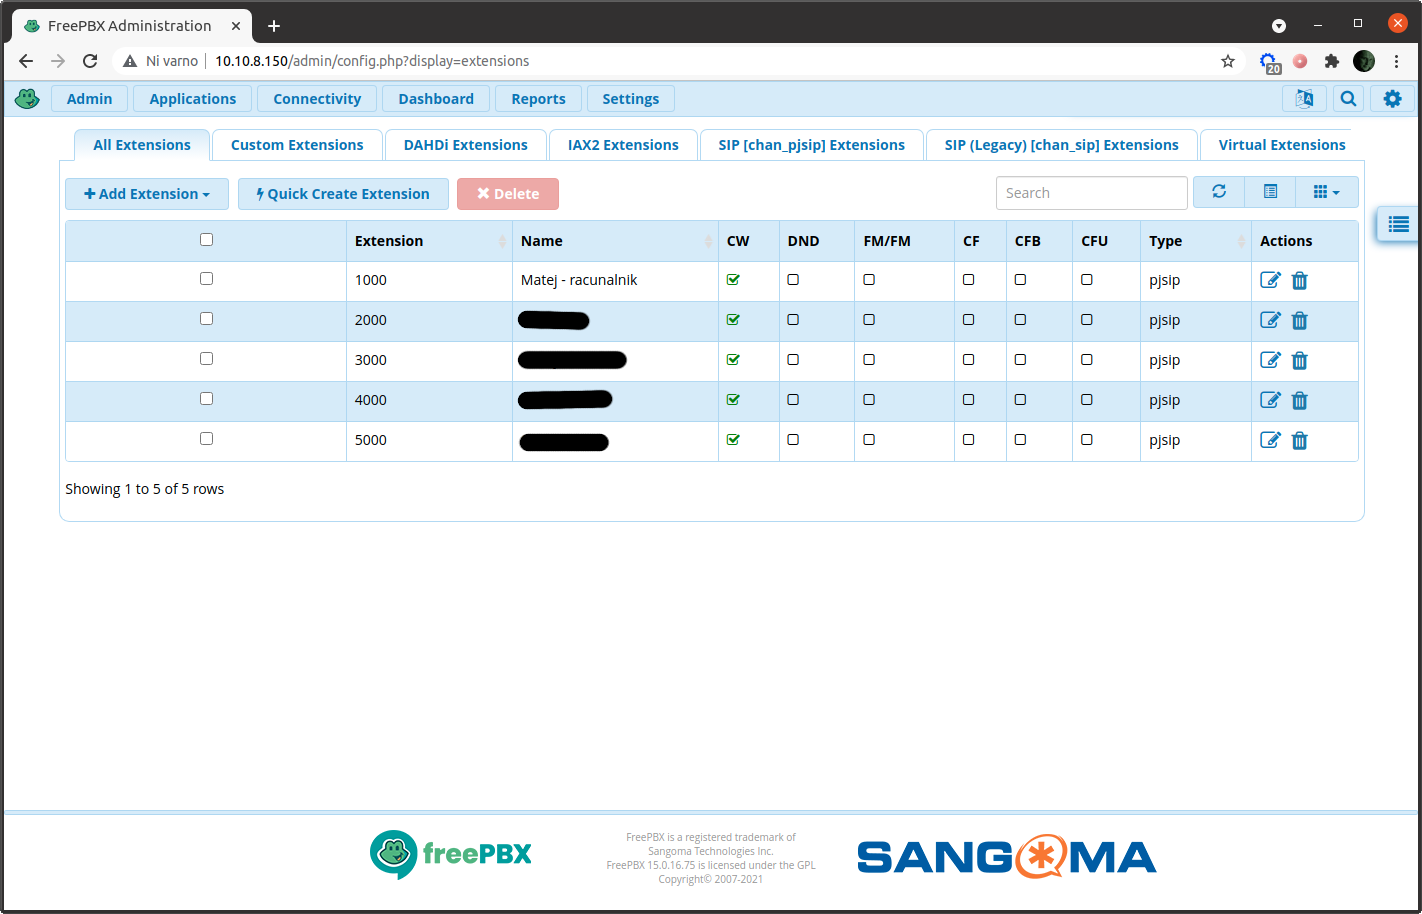
Set up extensions
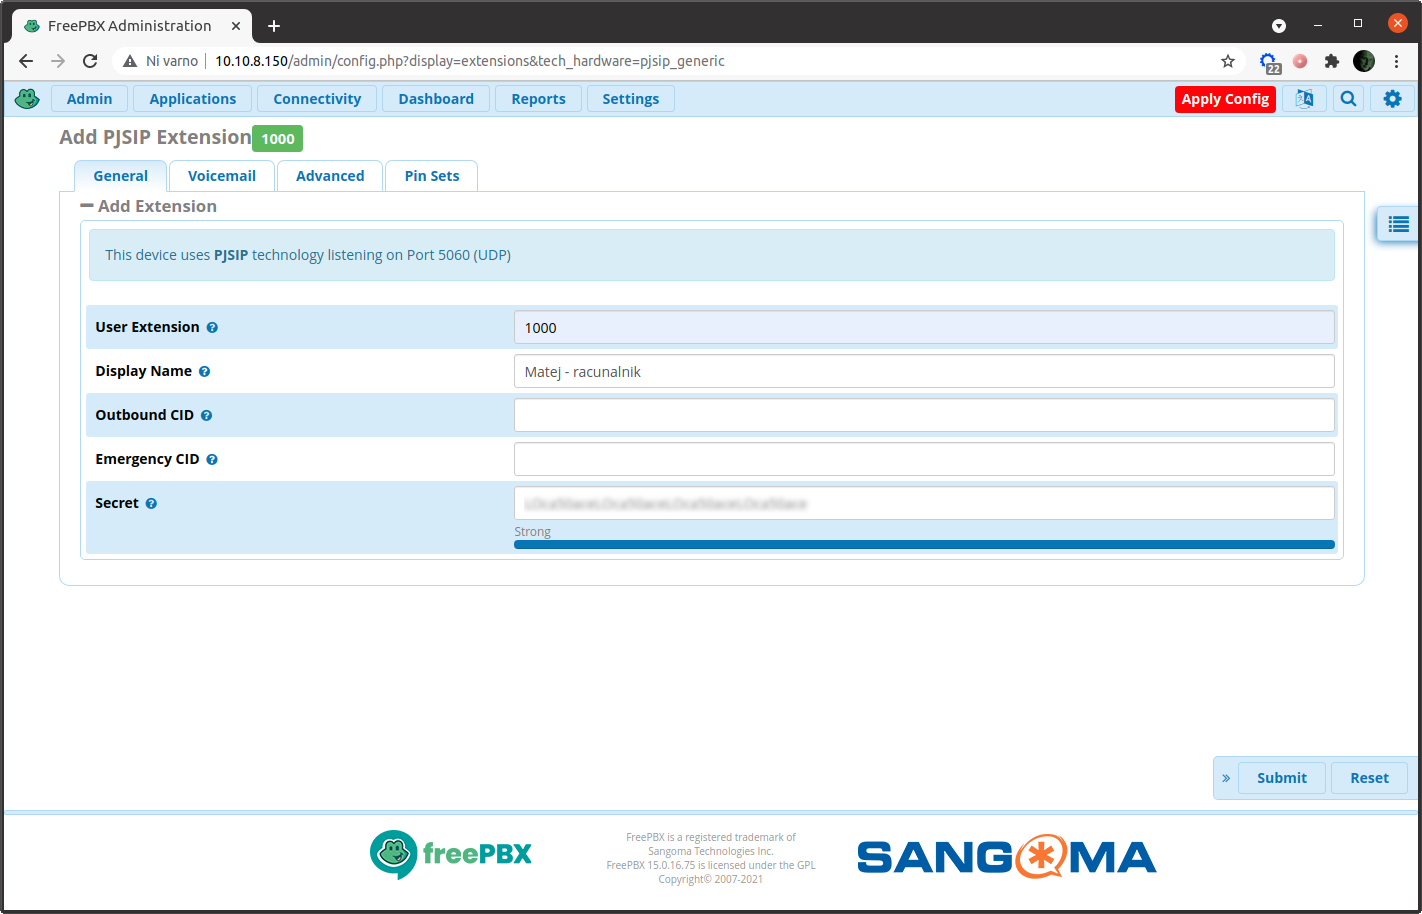
Now we can setup our extensions. Extensions are local numbers, connected to our RasPBX system. In FreePBX click Applications → Extensions. Click on a button Add Extension and add new SIP [chan_pjsip] extension.
Here you need to configure:
User extension: could be any number, I am using 4-digit local numbers and in my case I entered1000.Display name: obviously, this is a name of the user or device. I enteredMatej - racunalnik, which meaning is not so obvious for non-speakers of Slovenian language, but simply meansMatej - computer. Because, I am using this extension on my computer, right?- Secret: this is a password for your extension (or your SIP account, if you prefer this way), and is auto generated, but you can change it whatever you like. For instance, I entered… well, I am not gonna tell you that. Because it is secret, right?
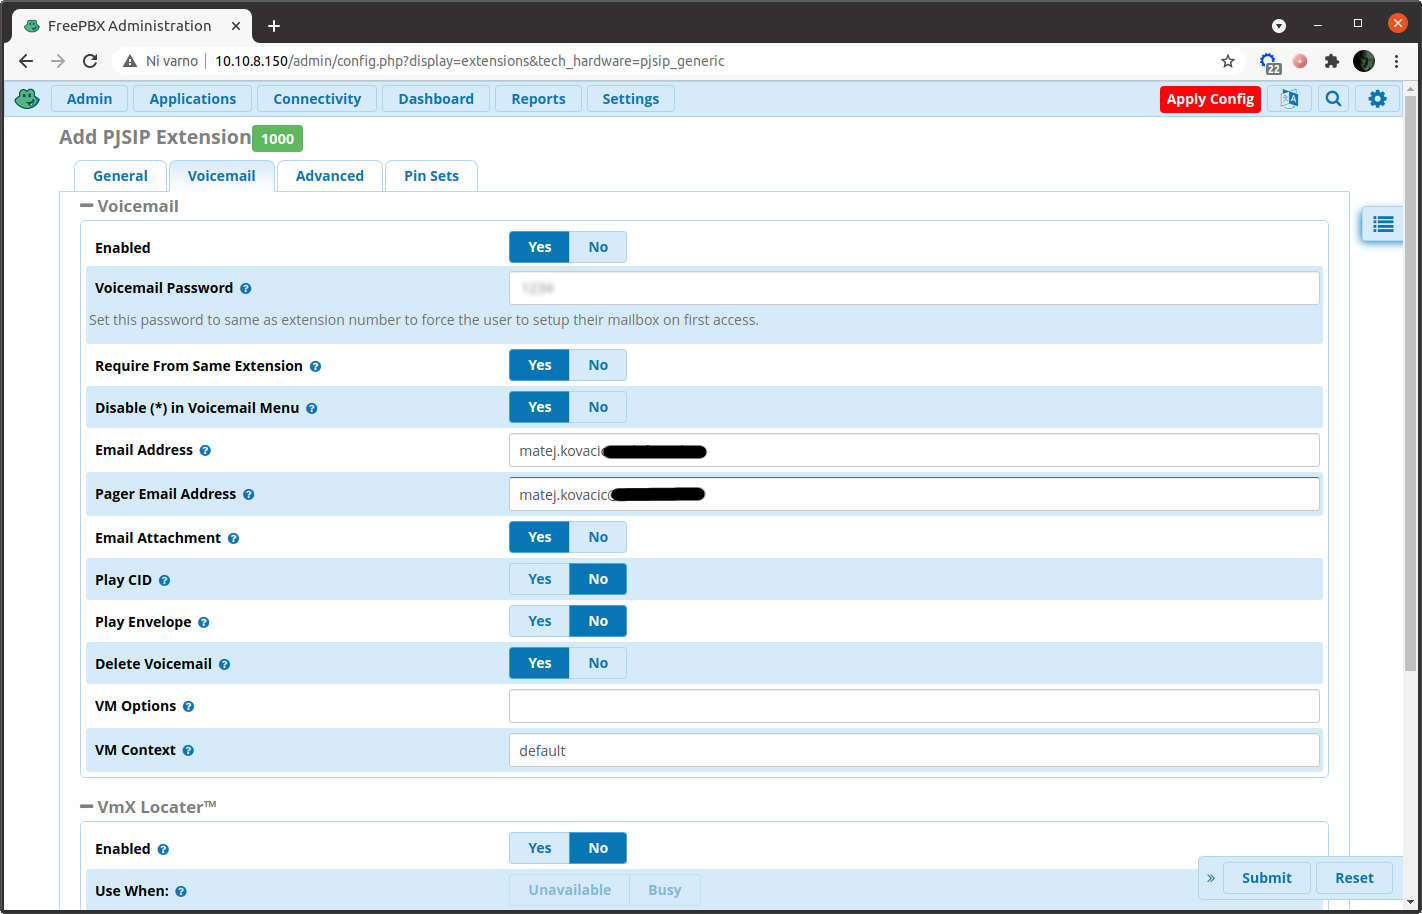
There are some other interesting things you can do. Under Voicemail you can enable voicemail. Some useful settings:
- Set
Voicemail Password(digits only). Disable (*) in Voicemail Menu: set it to no, so you will be able to use voice menus.Require From Same Extension: set it to yes (so user will be able to access their voicemail only from their extensions.- Set your
e-mail address(pager addressis for sending just a really short messages or e-mails). Email Attachment: set it to yes, which means voice messages will be sent to user by his e-mail.Delete Voicemail: set it to yes, which means voice messages will be deleted from the system after they are sent by e-mail.
Submit changes and then Apply config. You can add several additional extensions to connect your friends and family on your RasPBX. However, under current setup all these extensions will be able to use your trunk for outgoing calls. But don’t worry, we will take a look how to restrict them from calling outside.
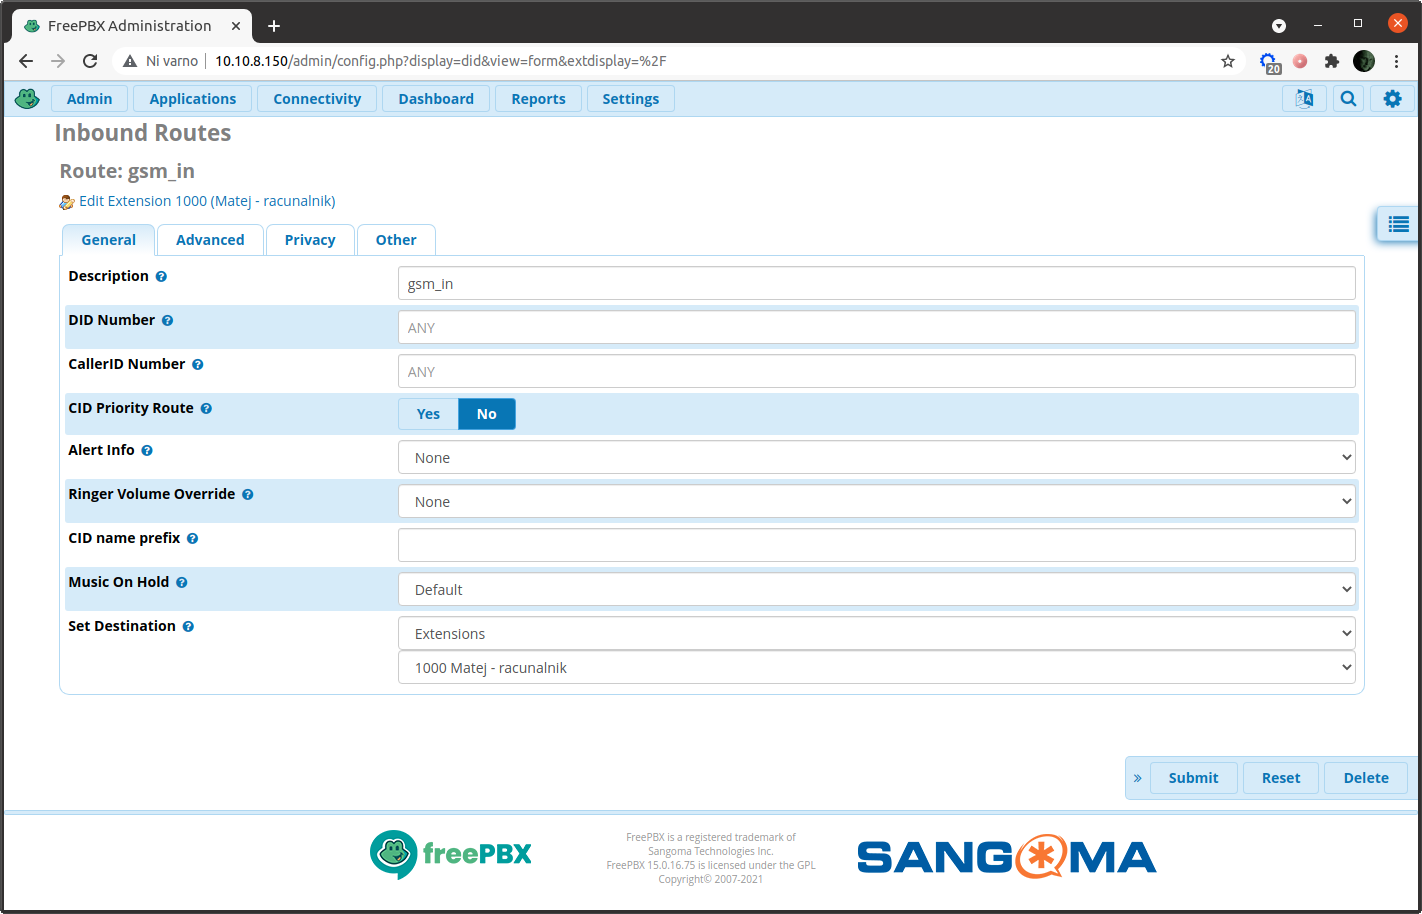
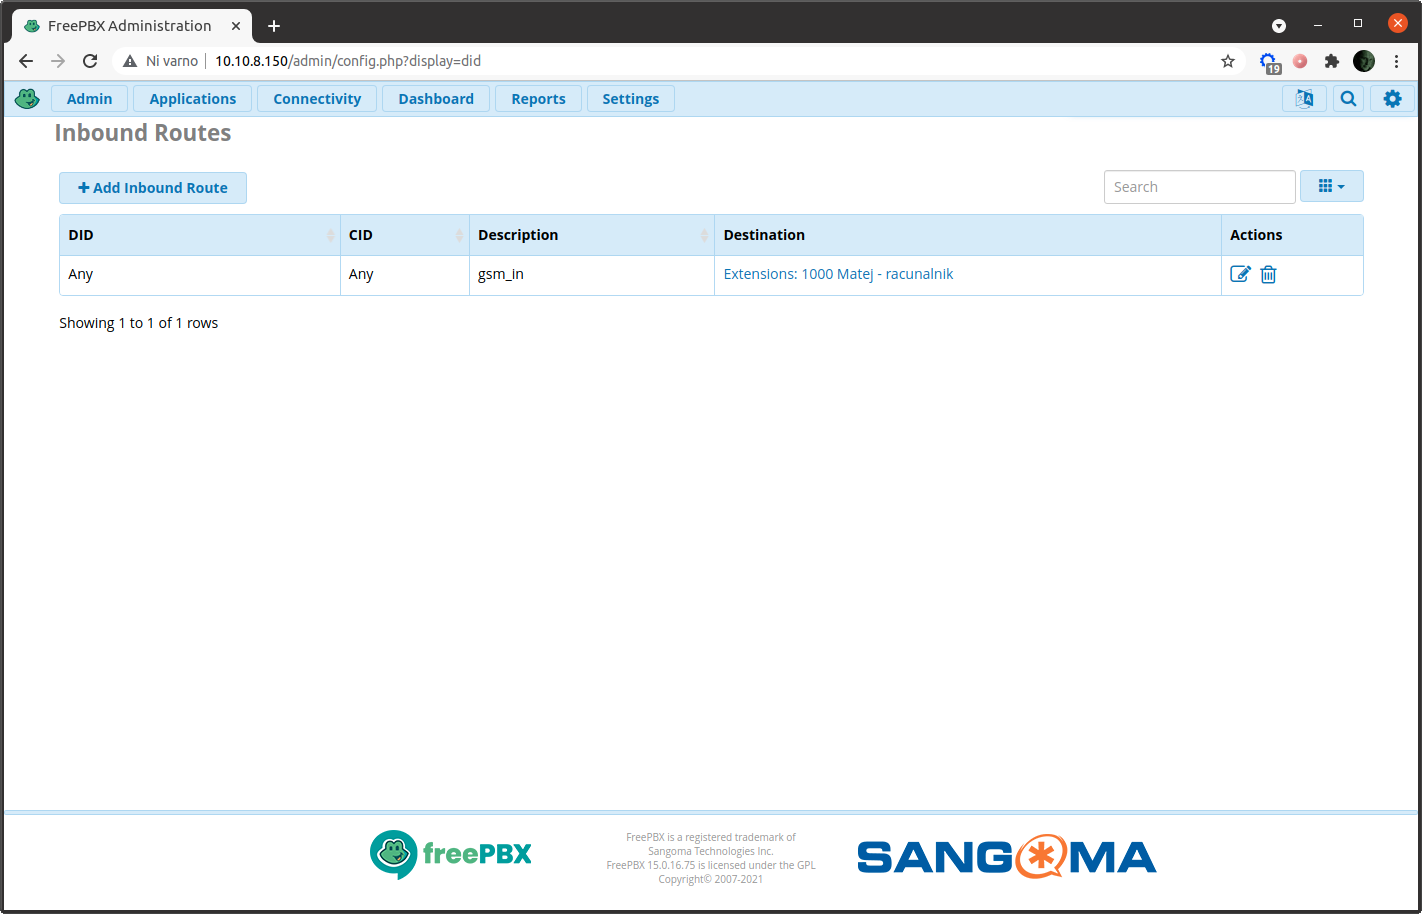
Set up inbound routes
Finally, we can set up where (to which extensions) incoming calls are directed. In FreePBX click Connectivity → Inbound routes. Click the button Inbound Route and set:
Description: enter the name of your inbound route, I usedgsm_in.Set destination-Select Extensionsand select your SIP extension. I selected1000 - "Matej - racunalnik".
Submit changes and then Apply config. That is it! Well, not really. But we can do some testing.
If we now call our RasPBX system (I mean the number on SIM card inserted in USB dongle) from the mobile or ordinary phone, we will get the voice message, that extension number 1000 is not available. This means our system is working, but because we did not configure any SIP client yet, so we are unable accept the call on our computer or smartphone.
Additional SIP settings
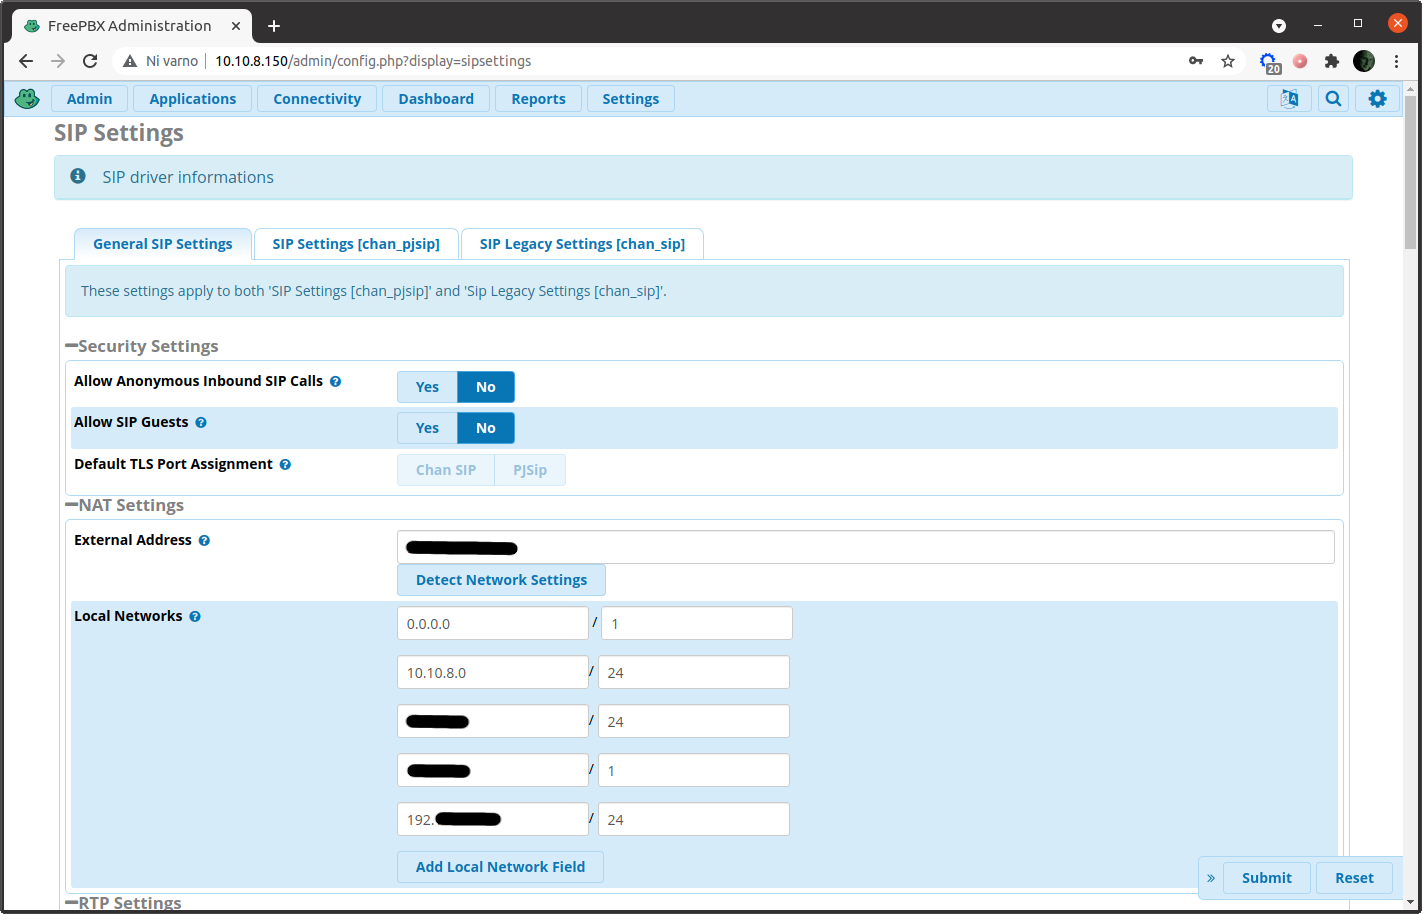
Now we can configure some additional settings, including some good security practices. In FreePBX click Settings → Asterisk SIP settings and go to General SIP Settings. Here you have to set:
Allow SIP Guests: set it to no, because this is a good security practice.- Then you should enable additional codec
g729, which we installed in terminal. - and you can also enable video support if you like (however, this will be working only for internal calls).
Now you select SIP Legacy Settings [chan_sip] (Settings → Asterisk SIP settings and go to SIP Legacy Settings [chan_sip]. Go to Other SIP Settings and enter alwaysauthreject=yes (this is also a good security practice).
Submit changes and then Apply config.
Enabling TCP instead of UDP
Many out of the box router features can unintentionally disrupt VoIP traffic. One of the features making problems is SIP ALG. ALG or Application Layer Gateway is designed to push specified kinds of traffic across your router’s NAT and firewall. A SIP ALG is specifically designed to pass SIP traffic through your router’s NAT/firewall to reach your phones. However, if SIP packets are already optimized to pass through NATs/firewalls without additional help, SIP ALG is causing problems. The reason is, that SIP ALG rewrites SIP packet headings, which can mangle the delivery process. This can make the device you’re calling believe that your phone is not behind a NAT, when in fact it is. If an ALG disrupts a call, it can lead to incoming call failure, and phones that unregister themselves.
I had these problems, and they manifested in inability to receive incoming calls and that calls were disconnected after 30 seconds. Disabling SIP ALG on my router did not stop call quality problems from happening, so I decided for a little bit more drastic measures. Bigger problems sometimes can be solved with bigger hammer.
My solution was to disable UDP and enable TCP. For those who don’t know what I am talking about - TCP and UDP are Internet protocols. TCP is a connection-oriented protocol, and UDP is a connectionless protocol. The main difference between TCP and UDP is speed. TCP is slower than UDP, however, retransmission of lost data packets is only possible with TCP.
In FreePBX click Settings → Asterisk SIP settings and go to SIP Settings [chan_pjsip]. Here you can disable UDP and enable TCP.
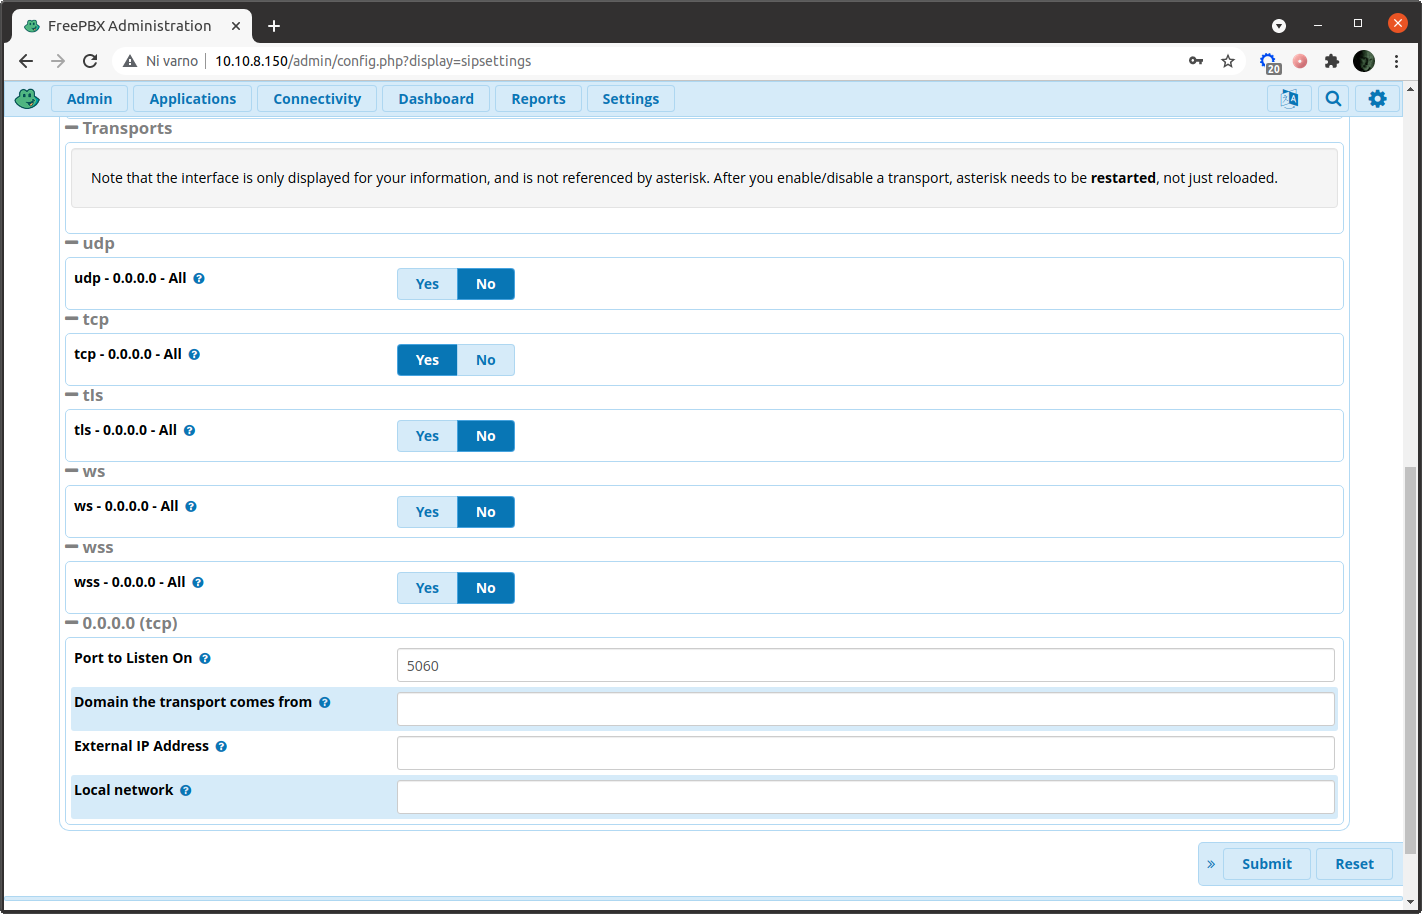
Submit changes and then Apply config.
Setting up SIP clients
Now we can setup our SIP clients (sofphones). I am using several operating systems, namely: Ubuntu Linux, Windows and MacOS on computer and one Android phone and an iPhone. So I was looking for the best client for each of those systems, preferably opensource, but quickly realized there are a lot of products, and each of them has its own set of problems. Finally I ended up on Zoiper, which is not opensource but free version works quite well. Although, I am missing ZRTP feature, so I am really open on your suggestions what should I use/try for different operating systems.
As mentioned, there are several SIP clients, but basically, you neet to setup user ID or username (this is your extension number, for instance 1000), domain (this is an IP address of your RasPBX device; it is also nice to add a port number, which is in our case 5060, so you would enter 10.10.8.150:5060) and a password (which is a secret of your extension). Usually, you will need to select transport, which in our case is TCP.
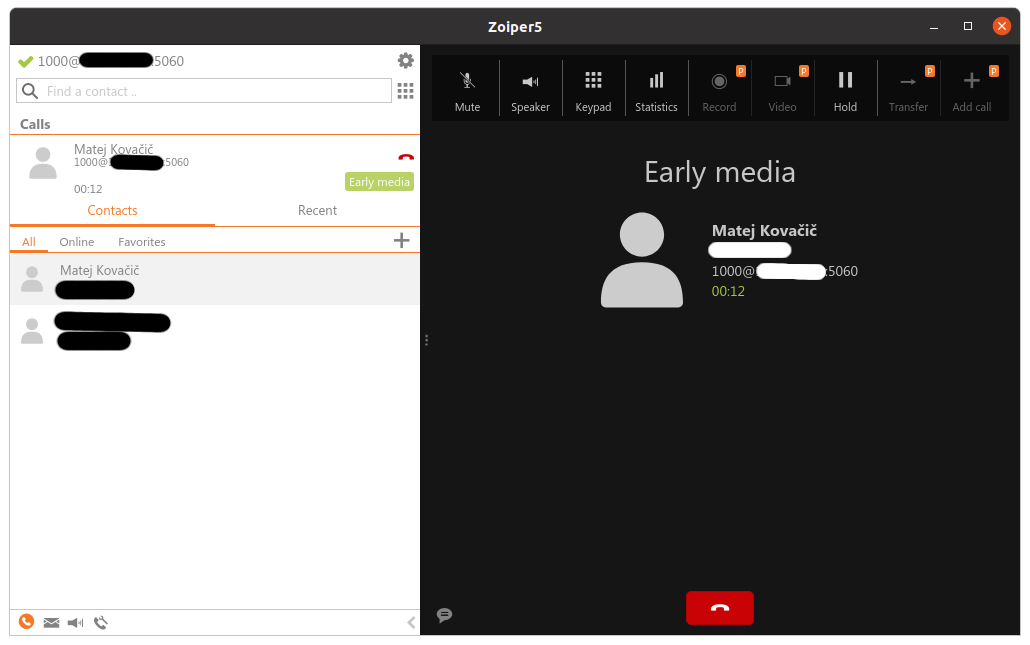
When your SIP client is successfully connected (in case you entered wrong password, fail2ban will block you for half an hour and you need to unban yourself), you can perform a test call out… and then of course a test call from the outside to your RasPBX. And you can also try internal calls between your extensions.
Your voicemail configuration
Now you can configure your voicemail (if you enabled it it FreePBX). From your SIP client call *97, type your password and listen to the voice menu. Basically, you can press 0 and the 1 for recording your “not available message”. When finished, press # and then 1 to accept and save the message. You can also record “busy message”, etc.
Then you can disconnect your SIP client (that it will be unavailable), and try to call its extension. You should be able to hear “not available message” and to leave voice message. This message will be recorded and then sent to your e-mail where you can play it. How cool is that, ha?
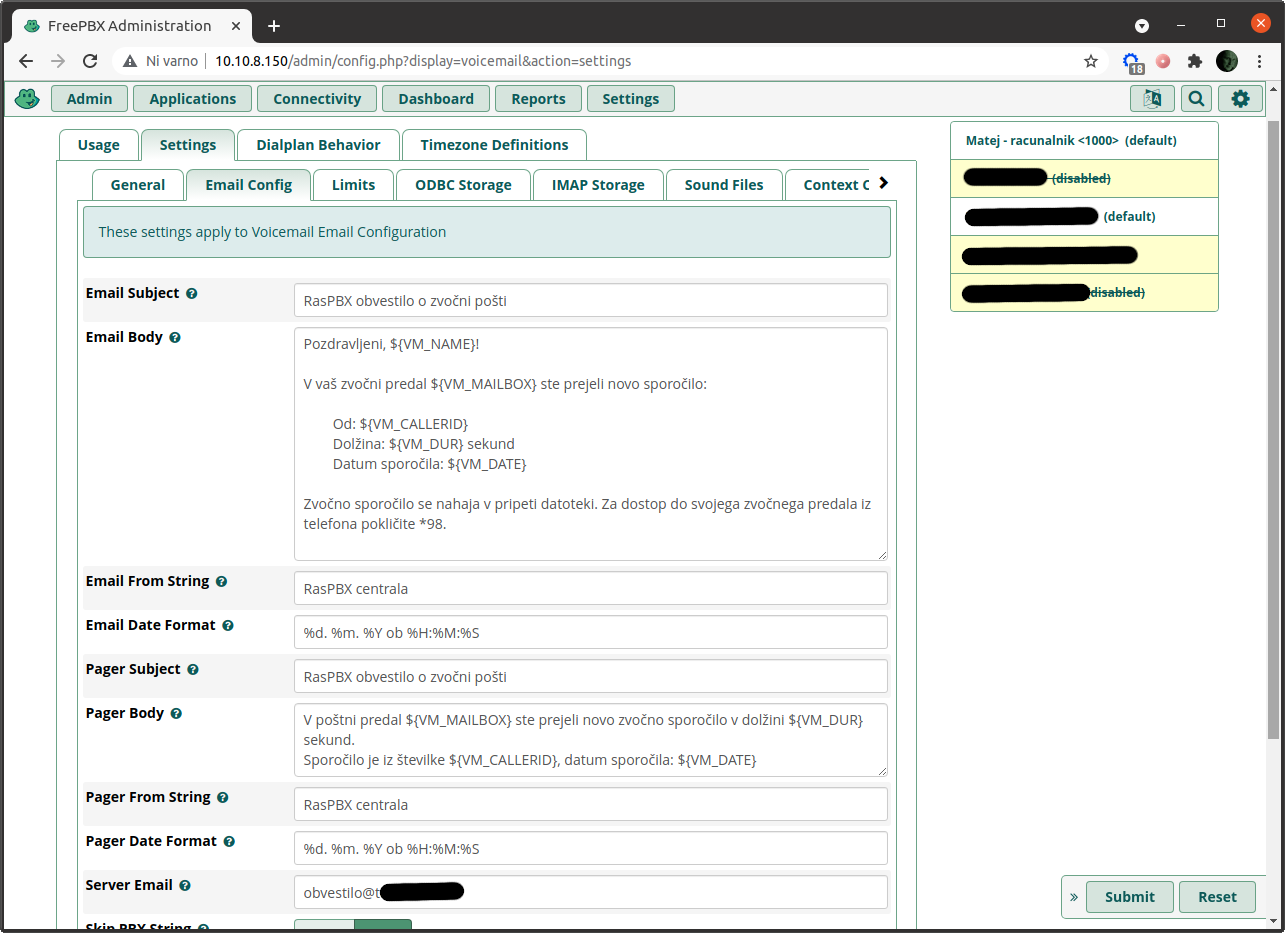
Anyway, you can go to Settings → Voicemail Admin → Settings → Email Config and change the content of the notification e-mail sent to user when voicemail is received. You should remove the reference to http://AMPWEBADDRESS/ucp, because User Control Panel module is not being used any more in FreePBX. And I personally think that it is easier sending voice messages as attachments to users.
Voicemail Admin e-mail configuration
The e-mail configuration for Voicemail Admin could be found under Settings → Voicemail Admin → Settings → Email Config. Here you can edit the from field, subject and body of e-mail notification about new voicemail message. Also you should check the Server e-mail field and enter your notification e-mail address (in my case obvestilo@xxxxx.si.
Just a note - if you have any troubles with e-mail delivery, you should check exim4 mail server logs on your RasPBX device. Just SSH to your RasPBX and list the content of a logfile with: cat /var/log/exim4/mainlog.
Some other things to do
Block extension to call outside
I promised I will show you how you can block a specific extension from calling outside. So let’s take a look.
There are several ways how to do this, but we will done this by creating a specific outbound route for this extension only. In FreePBX click Connectivity → Outbound routes and click on a button Add Outbound Route. Define some things:
Route Name: we will call this route4000_no_out, because we will block extension number4000from calling outside.Dial Patterns: here go to the fieldmatch patternand enter0[12345678]XXXXXXX.Dial Patterns: here go to the fieldCallerIDand enter the extension number you want to block, in our case4000.- Do not set
Trunk Sequence for Matched Routes.
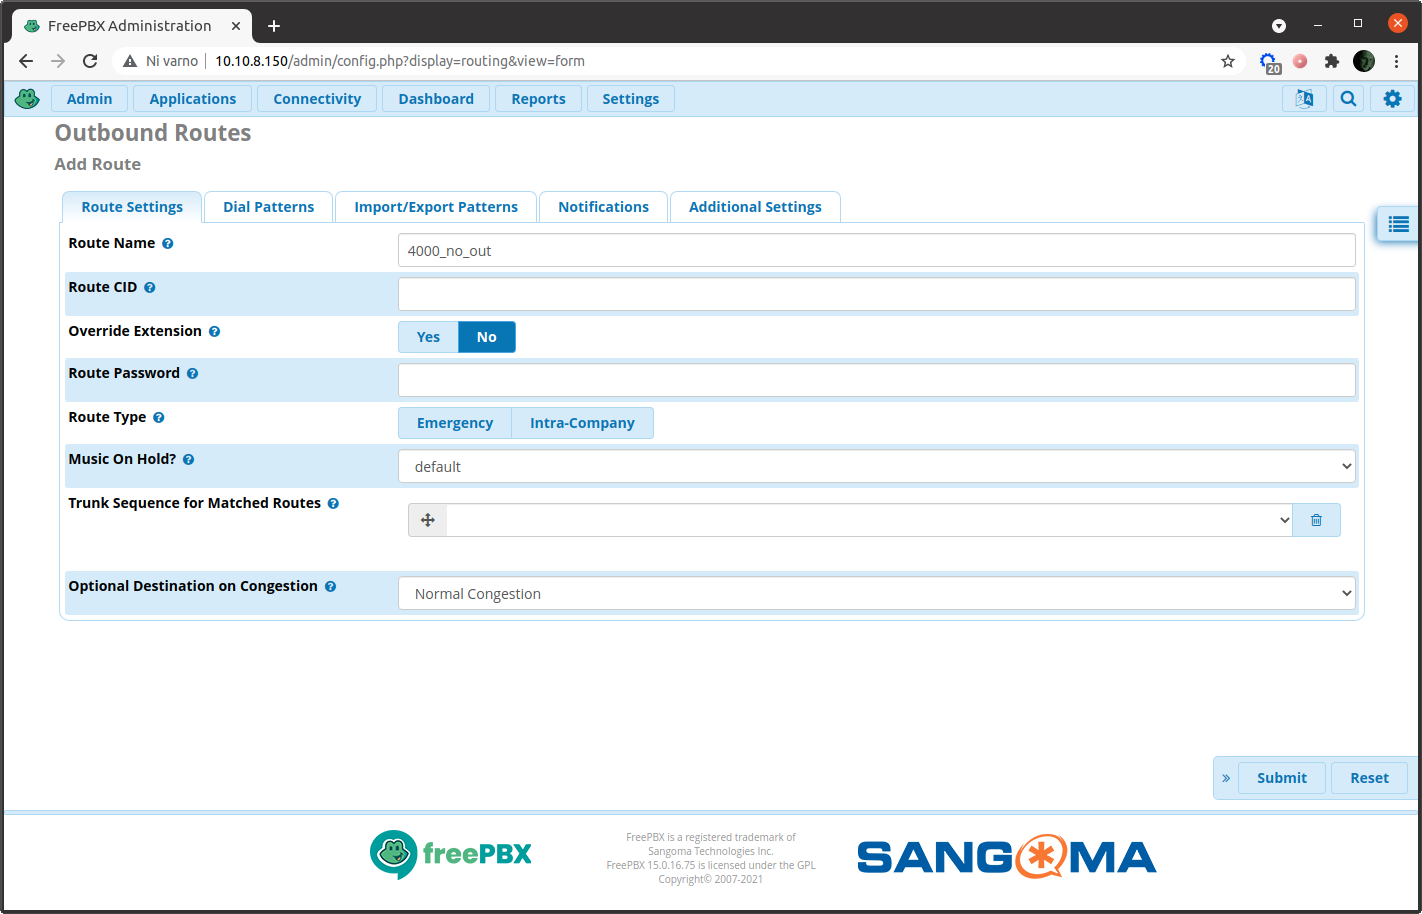

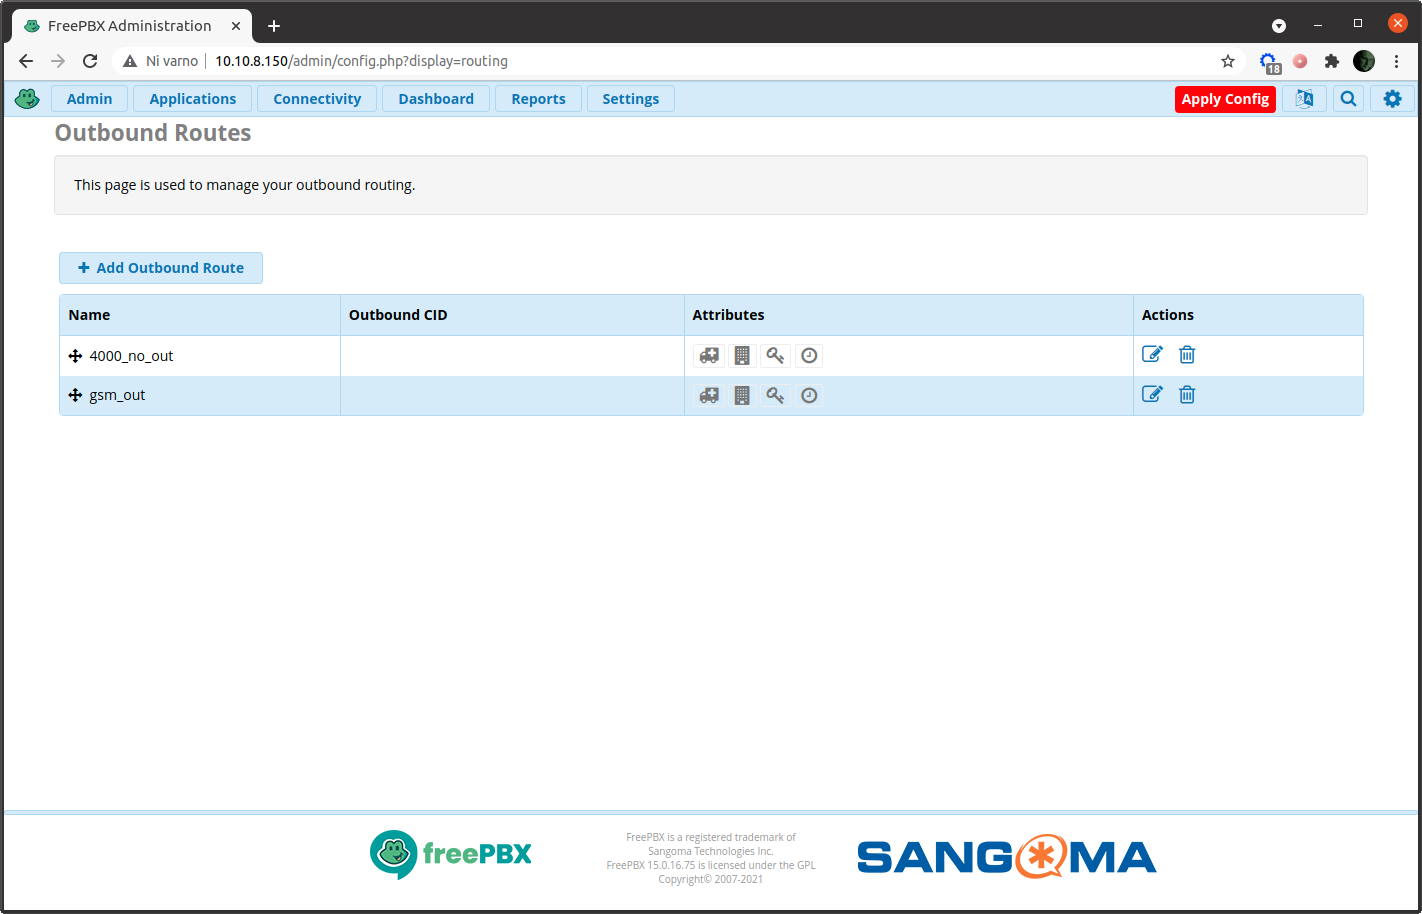
When you click Submit changes, you will be returned to a screen showing all outbound routes. Grab your newly created route from the bottom of the list and drag it to the top of the list. Then click Apply config.
Restrict extension to calling a specific number only
So, you want that a specific extension, let’s say 3000 will be able to call out, but only one specific number (for instance 031987654). Is it possible to do that?
Yes, it is, but it this is a tricky one. You need to set up two outbound routes and you have to keep in mind that outbound routes are top-down matching. That means first rule is checked first, then the second, etc.
So we will have the following algorithm:
- First rule: if extension
3000calls outside number031987654, the call is allowed. - If extension
3000calls any other outside number, jump to the second rule. - Second rule: if extension
3000calls any outside number (not any other, but any!), call is not allowed. And this is end of the rules for extension3000.
So, we will set up the first outgoing connection, saying, that extension 3000 can call outside number 031987654. In FreePBX click Connectivity → Outbound routes and click on a button Add Outbound Route. Now you should configure your outbound route:
Route Name:3000_to_my_mobile(meaning this extension can call my personal mobile only).Trunk Sequence for Matched Route: from the drop down menu selectgsm_dongle0.Dial Patterns: here go to the fieldmatch patternand enter0[12345678]XXXXXXX.
Now we add another rule. In FreePBX click Connectivity → Outbound routes and click on a button Add Outbound Route. Define some things:
Route Name:3000_no_out.Dial Patterns: here go to the fieldmatch patternand enter0[12345678]XXXXXXX.Dial Patterns: here go to the fieldCallerIDand enter the extension number you want to block, in our case3000.- Do not set
Trunk Sequence for Matched Routes.
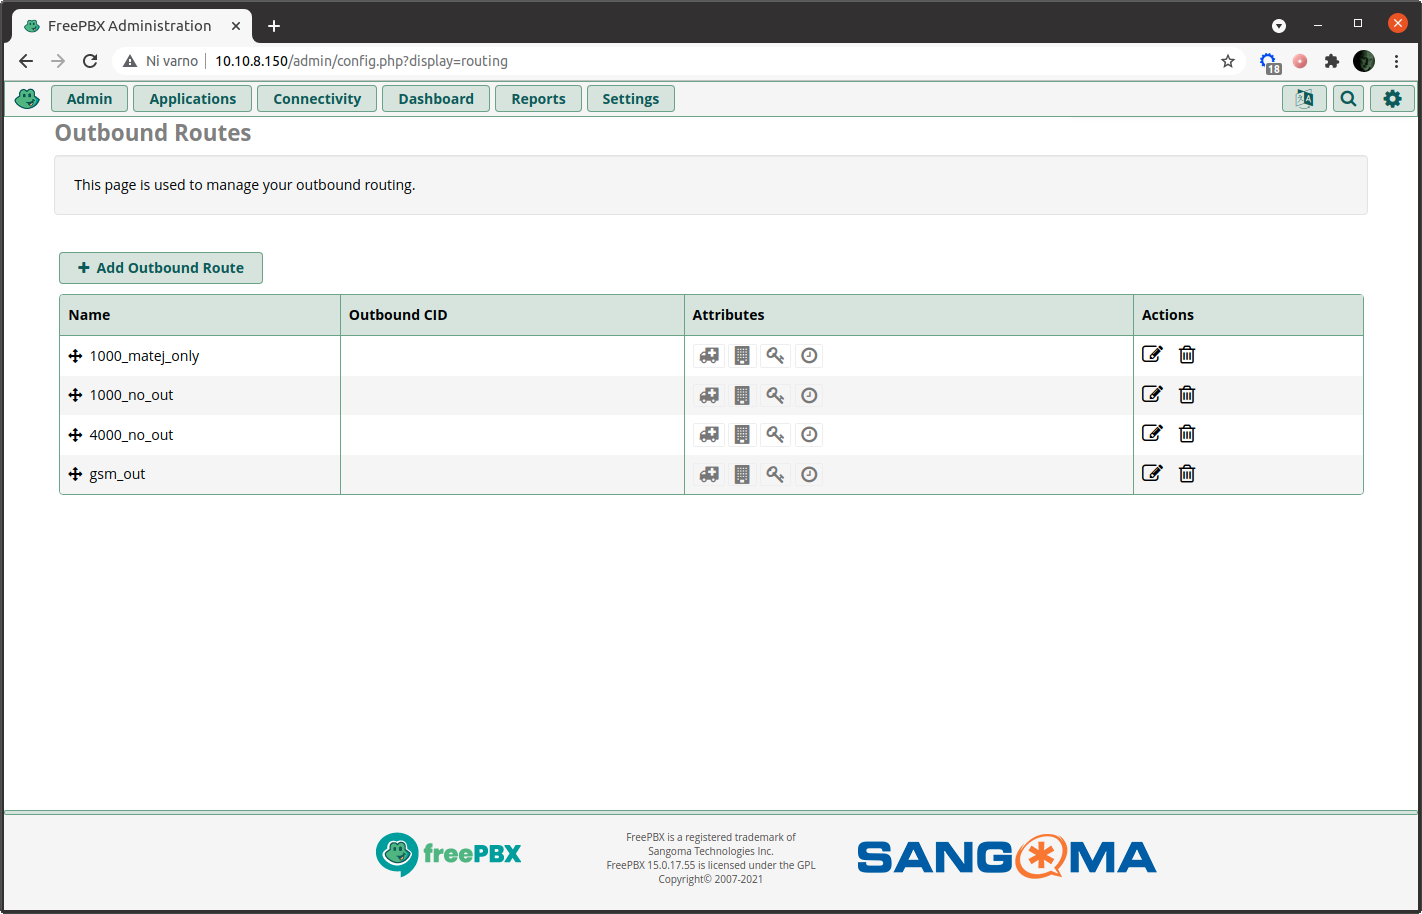
Finally arrange your newly created routes in such a a way, that first rule will be 3000_to_my_mobile and the second 3000_no_out. Your default route gsm_out should be at the bottom of the list. Then click Apply config, and that is it.
This all sounds quite straightforward, but the problem is if you have many routes, the whole system becomes very confusing. One of the solutions is to use dial patterns in the Caller ID field. When setting up outbound route go to the Dial Patterns in the field CallerID and enter the dial pattern of extension number you want to block, for instance 3XXX. That means that the outbound route will apply to all extensions from 3000 to 3999. Then you can have the following number assigning scheme:
- 1XXX extensions are assigned to you and your friends,
- 3XXX extensions are assigned to people who like you (so they can call you), but you don’t like them (and are not allowing them to call anyone else),
- 4XXX extensions are assigned to people you don’t like at all, so they cannot call outside your system,
- you do not assign any numbers to people you really hate.
Or you can do something else, but you probably got the idea how to use these dial patterns, right?
Updating the system
Your FreePBX system is configured for automatic updates (but not the RaspPBX operating system!), but you can manually check and update it.
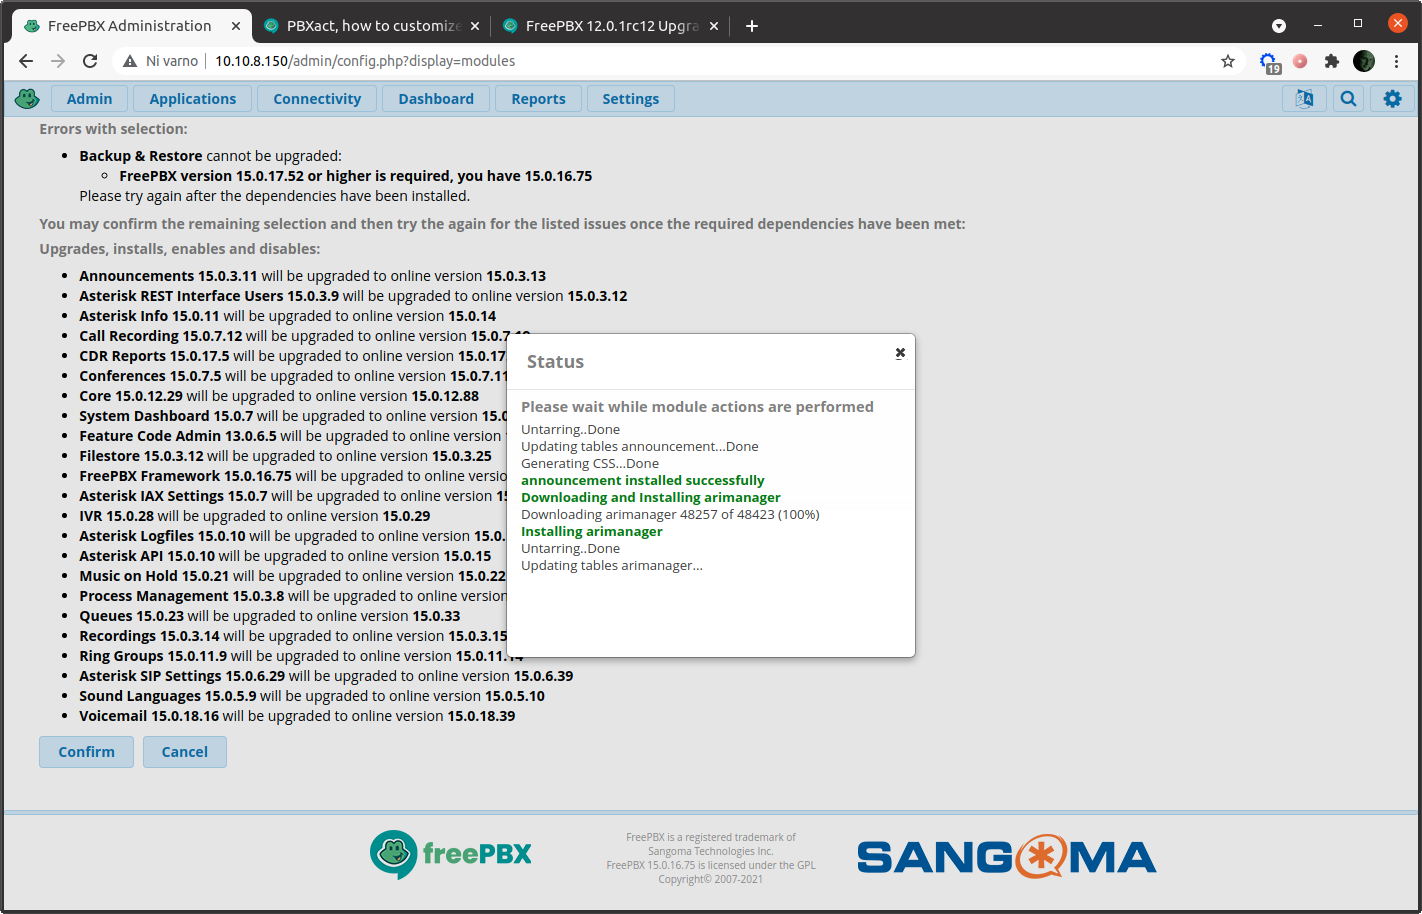
In FreePBX click Admin → Module Admin, click Check Online and it will find modules that need to be updated. You should try updating several times, because sometimes updates get stalled.
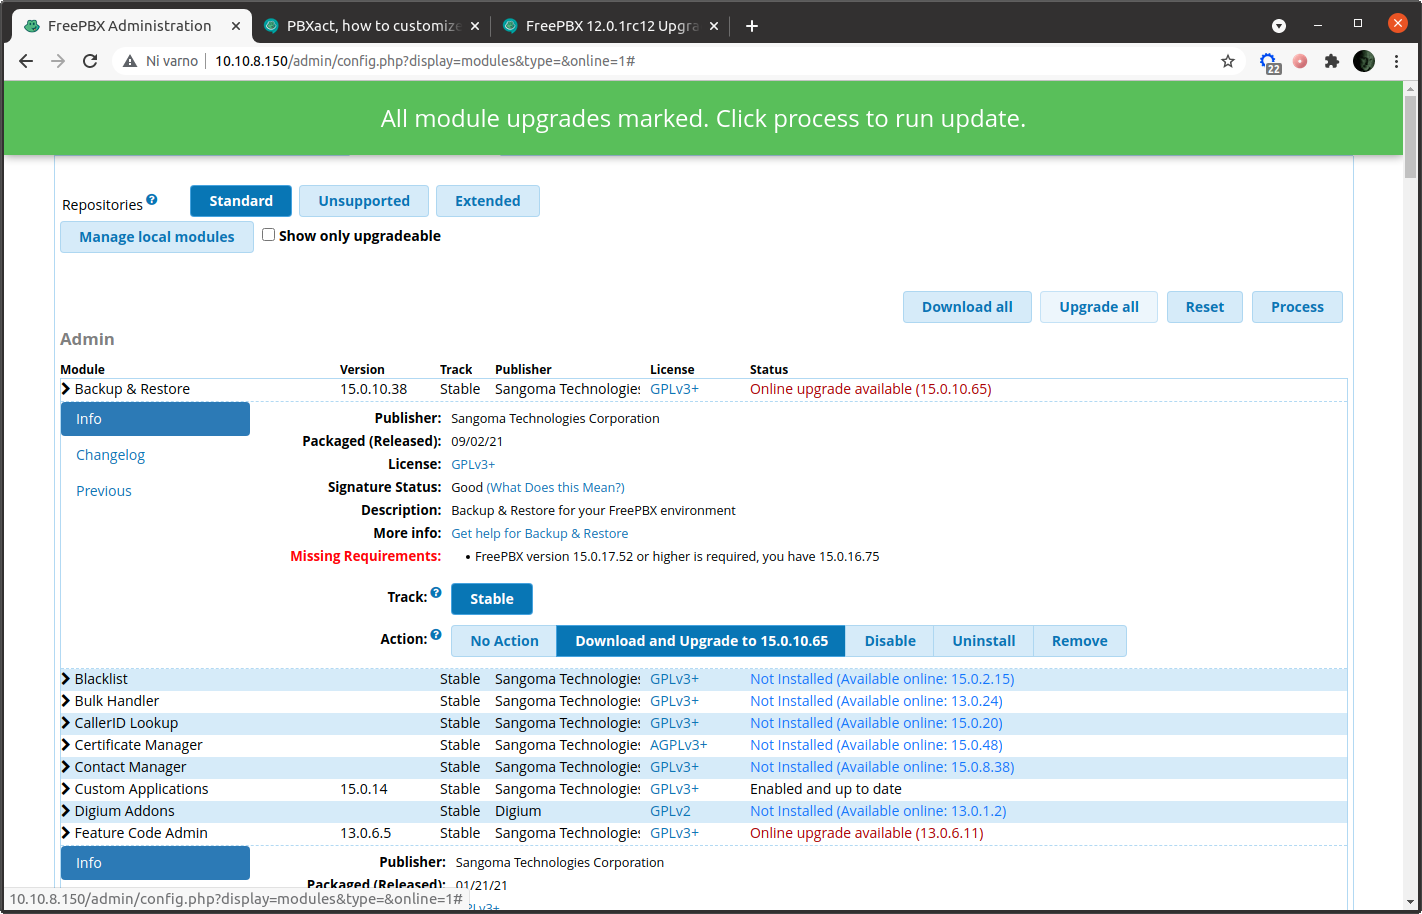
For updating operating system, you should SSH to your Raspberry and enter the command raspbx-upgrade.
Backups
In FreePBX click Settings → Filestore. Select the Local tab and click +Add Local Path. Fill in a name for the path, a description, and the path to the backup folder. I have entered backup path /var/spool/asterisk/backup. When finished click Submit in the bottom right corner of the page.
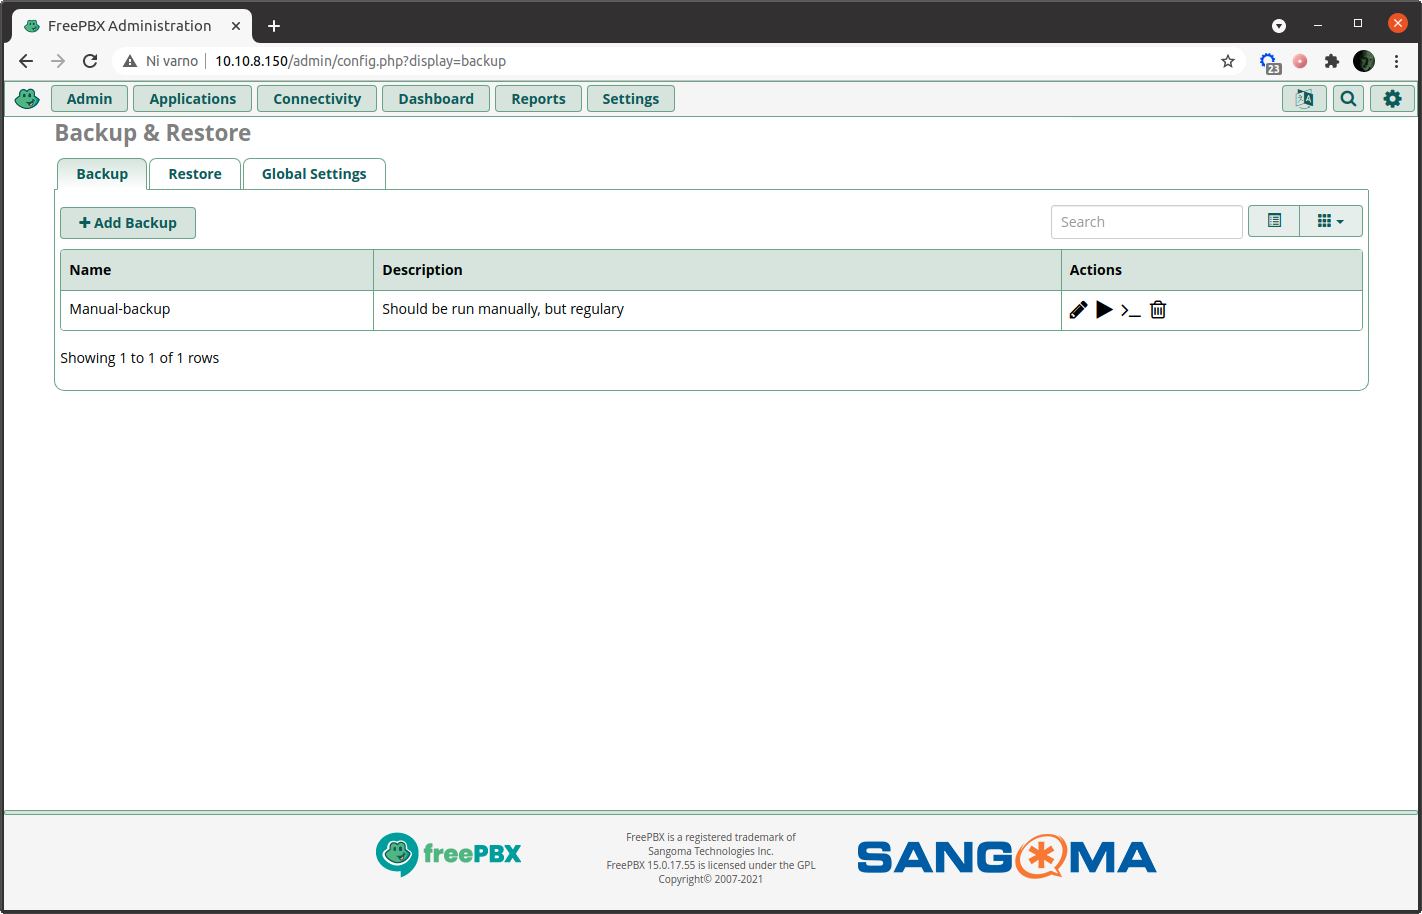
In FreePBX now click Admin and select Backup & Restore. Then select +Add Backup. Under Add Backup enter the backup name and a description. Set e-mail for notification and under Storage click the drop-down menu and select the file storage location you created earlier.
Click Submit in the lower right corner of the page. On the main Backup & Restore page you can run backup manually. Of course, you can also schedule automatic backups.
Backups are located in directory /var/spool/asterisk/backup. You can SSH into your RasPBX device and enter the command ls -lha /var/spool/asterisk/backup to see all the backups:
total 32M
drwxr-xr-x  3 asterisk asterisk 4,0K okt 29 22:21 .
drwxrwxr-x 13 asterisk asterisk 4,0K okt 29 22:03 ..
-rw-r--r--  1 asterisk asterisk  32M okt 29 22:21 20211029-222115-1635538875-15.0.17.55-77834617.tar.gz
drwxr-xr-x  2 asterisk asterisk 4,0K okt 29 22:21 Manual-backup
It is good to copy those backups to off-site location, but you already know that.
Some other cool things to do
Testing
I have performed several tests, and system is working quite well. I have also tried a connection from Chicago, United States to Slovenia, Europe, and calls between extensions were working very well (clear sound). From Chicago, United States I have also tried to call outside using trunk gsm_dongle0, and the call was working, but the sound quality was not very good. However, I have quite bad reception of mobile signal in my appartment, so this could also be a problem. Definitively more tests would be needed, but I encourage you to share your experiences with me.
Connecting the physical phone
Now that you have your very own PBX, you may start wondering, would it be possible to connect a physical phone to it? The answer is an absolute yes! You can buy a SIP desk phone, connect it to a network and configure it as an extension on your RasPBX system. There are several SIP phones available on the market, but I suggest you to check the list of supported devices first.
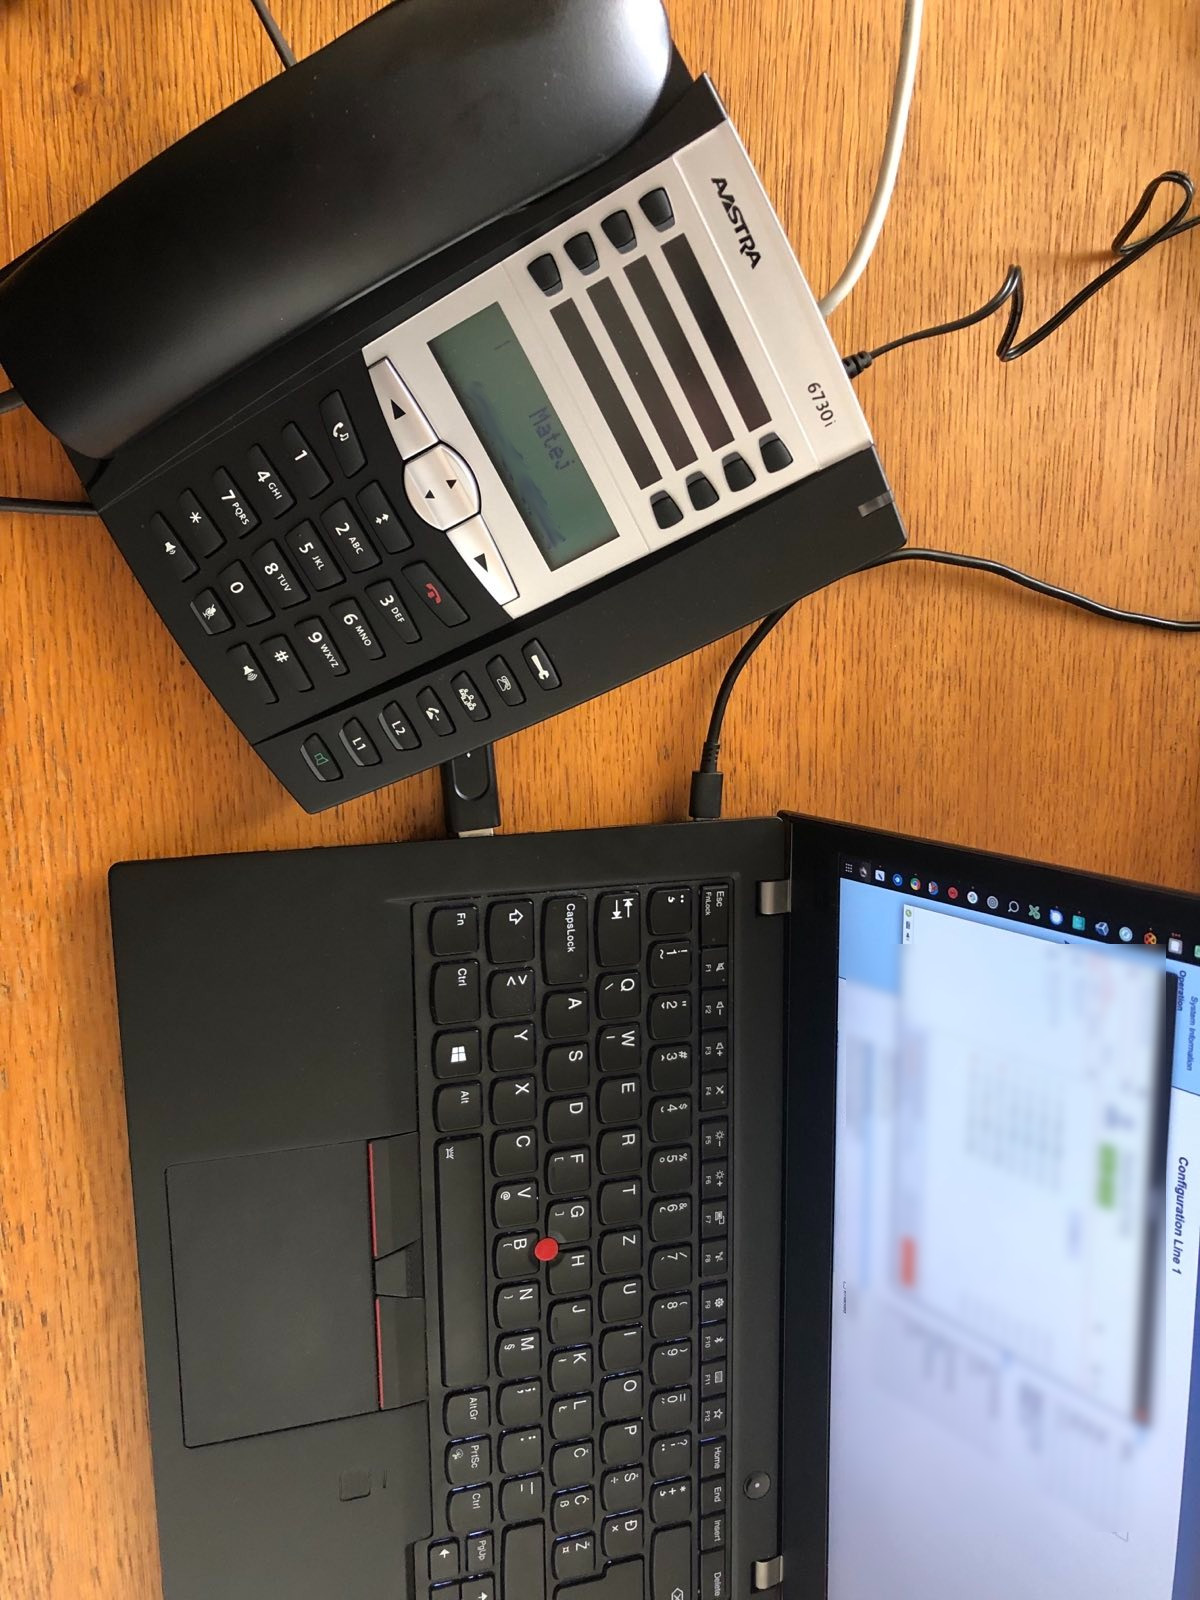
I decided to buy one of the Aastra phones, namely Aastra6730i, which is fully supported by FreePBX.
I managed to order it from a local shop and was lucky to get a big discount. So one sunny morning a postman rang on my door and couple of minutes later, I had my brand new Aastra6730i unboxed on my table. Yupi!
Configuring and connecting VoIP phone to your local network
I connected the phone to my local network, checked the network (I have used nmap) and found that Aastra phone has local IP address 192.168.1.225 and that it has two TCP ports open - 443/TCP which usually means that on a device is running HTTPS web server and 23/TCP, which usually means device is accessible through telnet protocol. The latter sounds quite bad, because telnet does not offer encrypted connections and should not be used any more. Actually, ssh replaced telnet in 1995, which is like ancient history. However, when I tried to login to a phone with telnet command, connection has been established, but I got no response from a phone at all. So it seems that management is possible only through web interface after all.
Actually, there is another way, you can find out Aastra’s IP address. It could be found out through phone. Just press the Options key on the phone and use scroll keys to go to 3 - Phone status and then IP&MAC Addresses.
Next thing was to run my web browser and enter the IP of a Aastra phone on URL line: https://192.168.1.225. As expected, I have got several warnings regarding the bad HTTPS security, expired digital certificate (certificate has been issued in September 2006 and expired in September 2009), and so on. But this is not a problem, because we are in a local network where we can protect our VoIP phone with other measures.
Now, for logging into a phone you need to enter username and a password. Administrator’s username is admin and password is 22222. Unfortunately, this cannot be changed. When I realized this I just stayed there for a couple of seconds with my mouth wide open… but OK, let’s make a call.
Through web interface I went to Basic Settings → Preferences and under Ringtones set Tone Set to Europe. This is not very important setting, but I just did that because settings are there to be changed, not left alone, right? Another thing was to set Time Format and Date Format under Time and Date Setting and checked that NTP time servers are enabled (they were).
Then it was the turn for the SIP account settings! In FreePBX I created new SIP [chan_pjsip] extension with the number 7000 and everything was ready to go.
Through web interface of the VoIP phone I went to Advanced Settings → Global SIP and under Advanced SIP Settings changed Transport Protocol to TCP and confirmed that Local SIP UDP/TCP Port in 5060. I also changed Codec Preference List (I set G.729 to the top), and then clicked Save Settings.
Then I went to Advanced Settings → Line 1 and set the following:
Screen Name:Matej(that’s my name, obviously).Phone Number:7000.Caller ID:7000.Authentication Name:7000(all these three are the extension number).Password: I just entered my extension’s password.Proxy Server:192.168.1.150.Proxy Port:5060.Outbound Proxy Server:192.168.1.150.Outbound Proxy Port:5060.Registrar Server:192.168.1.150.Registrar Port:5060.
The other settings were not changed. As you can see, I entered local IP address of my RasPBX 192.168.1.150 and port 5060 under proxy server, outbound proxy server and registrar server.
I also went to Basic Settings → Preferences and under General removed Local Dial Plan (it was set to x+#|xx+*), because I will be making dialling restrictions on a FreePBX.
After clicking Save Settings you need to reboot the phone, and true hackers prefer to do that remotely. So I went to Operation → Reset and under the Phone I clicked Restart button. A minute or so, and VoIP phone has been rebooted and successfully connected into my RasPBX!
When you log back into the phone, you can see that under Status → System Information. SIP Status is at the bottom of the page.
Now you can call out, you can accept calls, etc., and that everything looks just fine, but we need to take care of security first.
First we will get rid of SSL 3.0 HTTPS method. So I went to Advanced Settings → Network and under HTTPS Settings
you can set HTTPS Client Method to TLS 1.0. This is also not very good, because in year 2021 everything under TLS 1.2 is considered not be secure enough, but is way better than SSL 3.0. However, it doesn’t really matter, because we cannot change the default admin password, but let’s be strict on security, shall we?
Another thing is that firmware on the phone is a little old, so we should do some firmware update. Unfortunately, firmware for this phone cannot be found on an official Aastra website, but I have found it on Softpedia. However, the firmware update procedure is not very easy, you need to put the .st file to your TFTP, FTP or HTTP server, enter the server’s IP address and the name of the firmware file and then manually download and run a firmware update. I admit, I did not tried that yet, also because I am not sure how (if) the integrity of the firmware is being checked. If something goes wrong during the upgrade, you can easily brick your phone. And bricked phone is as good as… brick. Theoretically unbricking could be done by opening a phone, connecting the flash chip to the hardware programmer, but you need a special equipment, extended knowledge of the hardware, etc. Believe me, you don’t want to try that. So for now, it will stay as it is.
Connecting VoIP phone to the VPN
This all sounds just fine, but the problem is, that if your phone is connected to your local network (the same network where your RasPBX is also connected), you are a little bit limited. Especially if you would like to use your phone at some distant location. As we all know, the maximum length of the Ethernet cable is limited to 100 meters - and that is not much of a distance.
However, this problem can and will be solved with VPN.
The idea is simple. You just need to connect your VoIP phone to your VPN network, set proxy server, outbound proxy server and registrar server to your RasPBX VPN IP, and everything should just start working.
Some VoIP phones have support for OpenVPN, but not my Aastra 6730i. Besides, you may want to connect the phone to Wireguard or some other type of VPN network. So how to connect your old tech phone to a modern VPN network?
The answer is simple. With RaspberryPi.
RaspberryPi as a router for the wired network
I had a spare RaspberryPi 3 laying around and decided to transform it into wired router. So RaspberryPi will be connected to wired network, on it there will be a VPN client and VoIP phone will then be connected to RaspberryPi with Ethernet cable. In other words, RaspberryPi will be acting as a bridge to a VPN network for your VoIP phone.
Now, this idea looks fine, but RaspberryPi has only one Ethernet connection. That’s why we need to buy USB to RJ45 adapter (it costs a few Euros). RaspberryPi has also a WiFi connection, it could be possible to connect it to a wireless network, but wireless connections are not so reliable as wired ones, so I decided to use the USB adapter.
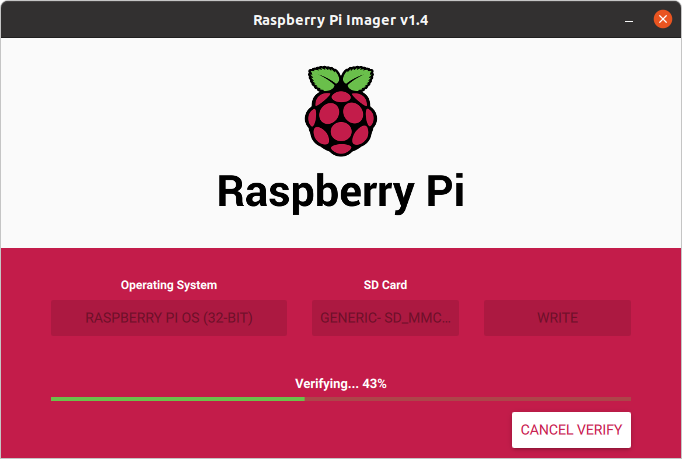
As we now know the drill, let’s go quickly through RaspberryPi installation. I copied RaspberryPi OS to an SD card with RaspberryPi Imager and before ejecting the card, I created a file named ssh on a /boot partition. Why? Because this enables SSH server on a RaspberryPi - and I want to work on these devices remotely, over the network. In Linux you just go to the /boot folder of the SD cart and use command touch ssh.
Then I logged in my freshly installed RaspberryPi with ssh pi@192.168.1.228. Default username is pi and the default password is raspberry.
A quick walk through:
- Change the password with
passwdcommand. - Update the system (
sudo apt update,sudo apt upgrade) and remove unused packages (sudo apt autoremove). - Run
sudo raspi-configand underSystem Optionsset hostname (I changed it tovpnbridge), underLocalisation Optionsset your time zone, keyboard and WLAN country. Finally, underAdvanced OptionsselectExpand Filesystem. After that RaspberryPi needs to be rebooted. - Then I ran
sudo dpkg-reconfigure localesbecause I am using Slovenian locales. - I also installed
ntppackage (fake-hwclockwas already installed) and set up NTP servers. - Finally, I installed
openvpnpackage and configured VPN client. Oh, and I took care of security settings.
Now we need to configure USB to Ethernet adapter. In our system is named eth1 (we can check this with ip a command, so we create a special configuration file: sudo nano /etc/network/interfaces.d/eth1 and put the following configuration in it:
auto eth1
iface eth1 inet static
address 192.168.100.1
netmask 255.255.255.0
This will tell the operating system to set static IP address to our eth1 network interface (USB to RJ45 adapter) and this IP will be 192.168.100.1. Of course, we should use different network range on eth1 as it is used on eth0, that’s why we used this specific network range. But depending on your network settings, you can use something else.
Now we need to install DHCP server:
sudo apt install isc-dhcp-server
And configure it by opening the configuration file with: sudo nano /etc/dhcp/dhcpd.conf. In the file you should set the domain-name and domain-name-servers as follows:
option domain-name "vpnbridge.local";
option domain-name-servers 8.8.8.8, 8.8.4.4;
Find and uncomment authoritative; line, so it will look like this:
authoritative;
Also, add the following lines to the configuration file:
subnet 192.168.100.0 netmask 255.255.255.0 {
    range 192.168.100.50 192.168.100.240;
    option routers 192.168.100.1;
    option subnet-mask 255.255.255.0;
}
Now you can save the file.
Then open another configuration file: sudo nano /etc/default/isc-dhcp-server and set the INTERFACESv4 to eth1:
INTERFACESv4="eth1"
All these settings will tell the DHCP server to listen to network interface eth1, and when new network device is connected, to assign it an IP address with DHCP in the range from 192.168.100.50 to 192.168.100.240.
Now we can reboot the device: sudo reboot.
After the device boots up again, we can SSH to it. Device now has three network interfaces (actually more, but one is local host and one Wi-Fi interface):
eth0: where RaspberryPi is connected to the internet.eth1: we will connect VoIP phone here.tun0: where RaspberryPi is connected to VPN network.
So let’s connect the phone to USB to ethernet adapter.
When we do that, DHCP server listening on eth1 will automatically assign a VoIP phone an IP address. We can check that with command: sudo systemctl status isc-dhcp-server
● isc-dhcp-server.service - LSB: DHCP server
   Loaded: loaded (/etc/init.d/isc-dhcp-server; generated)
   Active: active (running) since Tue 2021-11-09 20:18:12 CET; 26min ago
     Docs: man:systemd-sysv-generator(8)
  Process: 537 ExecStart=/etc/init.d/isc-dhcp-server start (code=exited, status=0/SUCCESS)
    Tasks: 1 (limit: 2059)
   CGroup: /system.slice/isc-dhcp-server.service
           └─585 /usr/sbin/dhcpd -4 -q -cf /etc/dhcp/dhcpd.conf eth1

nov 09 20:42:08 vpnbridge dhcpd[585]: DHCPACK on 192.168.100.50 to 00:e0:4c:86:a3:a2 (vpnbridge) via eth1
nov 09 20:42:27 vpnbridge dhcpd[585]: reuse_lease: lease age 35 (secs) under 25% threshold, reply with unaltered, existing lease for 192.168.100.50
nov 09 20:42:27 vpnbridge dhcpd[585]: DHCPREQUEST for 192.168.100.50 from 00:e0:4c:86:a3:a2 (vpnbridge) via eth1
nov 09 20:42:27 vpnbridge dhcpd[585]: DHCPACK on 192.168.100.50 to 00:e0:4c:86:a3:a2 (vpnbridge) via eth1
nov 09 20:42:40 vpnbridge dhcpd[585]: reuse_lease: lease age 41 (secs) under 25% threshold, reply with unaltered, existing lease for 192.168.100.51
nov 09 20:42:40 vpnbridge dhcpd[585]: DHCPDISCOVER from 00:08:5d:30:a8:a7 (6730i00085D30A8A7) via eth1
nov 09 20:42:40 vpnbridge dhcpd[585]: DHCPOFFER on 192.168.100.51 to 00:08:5d:30:a8:a7 (6730i00085D30A8A7) via eth1
nov 09 20:42:45 vpnbridge dhcpd[585]: reuse_lease: lease age 46 (secs) under 25% threshold, reply with unaltered, existing lease for 192.168.100.51
nov 09 20:42:45 vpnbridge dhcpd[585]: DHCPREQUEST for 192.168.100.51 (192.168.100.1) from 00:08:5d:30:a8:a7 (6730i00085D30A8A7) via eth1
nov 09 20:42:45 vpnbridge dhcpd[585]: DHCPACK on 192.168.100.51 to 00:08:5d:30:a8:a7 (6730i00085D30A8A7) via eth1
As you can see from DHCPACK line, Aastra VoIP phone with MAC address 00:08:5d:30:a8:a7 and hostname 6730i00085D30A8A7 has IP address 192.168.100.51.
So that is the IP address of our VoIP phone. (BTW, we can get these information also from file /var/lib/dhcp/dhcpd.leases).
Now, the problem is, that it is possible, that next time DHCP server will assign our device a different IP address. So we need to set up static IP. This is not hard, if we know what we are doing.
After we checked DHCPACK and found out the MAC address of our VoIP phone. Then we just need to open DHCP server configuration file with sudo nano /etc/dhcp/dhcpd.conf and add the following configuration to it:
host aastraphone {
  hardware ethernet 00:08:5d:30:a8:a7;
  fixed-address 192.168.0.51;
}
The configuration is quite straightforward, so it does not need additional explanation.
finally we just restart DHCP server to see if everything is working well, and that is it: sudo systemctl restart isc-dhcp-server.service
Now our phone is connected to vpnbridge RaspberryPi device and has an IP address assigned, but it is not working. Why?
Because we need to set up routing. First step is to enable IPv4 forwarding so that all traffic from eth1 could be forwarded to the internet or VPN. We enter the command: sudo sysctl -w net.ipv4.ip_forward=1 and that is it. But we would like that IPv4 forwarding remains active after reboot, so we need to open the sysctl.conf file: sudo nano /etc/sysctl.conf and then uncomment the line to enable packet forwarding for IPv4:
net.ipv4.ip_forward=1
Then we can reload sysctl changes: sudo sysctl -p and that is it. We can check that IPv4 forwarding is active by entering a command: cat /proc/sys/net/ipv4/ip_forward - it will print out 1 if IPv4 forwarding is active, and 0 if it is not.
Now we need to tell the operating system exactly which traffic should be forwarded and where exactly. We want that traffic from a VoIP phone will be routed directly to VPN, in other words, we want this: eth1 → tun0. So we tell the machine to do this:
sudo iptables -t nat -A POSTROUTING -o tun0 -j MASQUERADE
sudo iptables -A FORWARD -i tun0 -o eth1 -m state --state RELATED,ESTABLISHED -j ACCEPT
sudo iptables -A FORWARD -i eth1 -o tun0 -j ACCEPT
Now our VoIP phone has a direct access to our VPN network! We also want that these rules are persistent (remain active after reboot), so we open the file: sudo nano /etc/openvpn/update-resolv-conf and add these lines to the bottom of it:
# eth1 to VPN routing!
sudo iptables -t nat -A POSTROUTING -o tun0 -j MASQUERADE
sudo iptables -A FORWARD -i tun0 -o eth1 -m state --state RELATED,ESTABLISHED -j ACCEPT
sudo iptables -A FORWARD -i eth1 -o tun0 -j ACCEPT
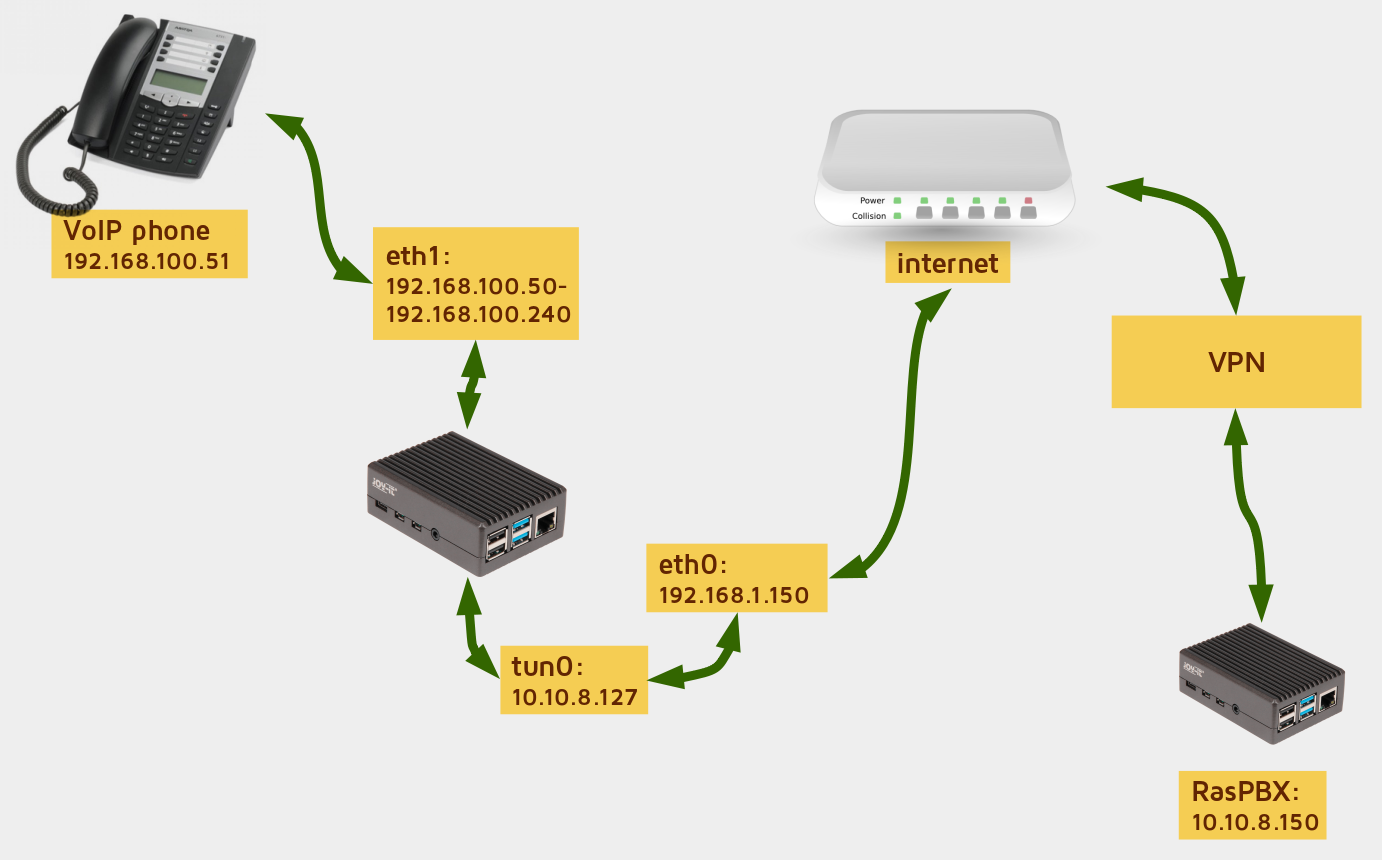
After reboot, any device connected on USB to Ethernet adapter will be assigned an IP address from a range 192.168.100.50 - 192.168.100.240 and will have a direct access to our VPN network.
Access to VoIP phone from the VPN network
Now the devices connected to RaspberryPi have the access to the VPN network, but we would like to have an access to the VoIP phone from VPN network too. Actually, we would like to have access to the web management interface of Aastra phone.
We will solve this with web proxy. First, we install nginx web server: sudo apt install nginx. Then open the file sudo nano /etc/nginx/nginx.conf and change (or add) the line:
worker_processes 1;
Then we edit sites-enabled config file: sudo nano /etc/nginx/sites-enabled/default. It should contain the following text:
# Redirection to Aastra phone
server {
    listen 443 default_server;

    root /var/www/html;
    index index.html index.htm;
    server_name _;

    ssl on;
    ssl_certificate /etc/ssl/certs/ssl-cert-snakeoil.pem;
    ssl_certificate_key /etc/ssl/private/ssl-cert-snakeoil.key;

    location / {
        proxy_set_header X-Forwarded-For $proxy_add_x_forwarded_for;
        proxy_set_header Host $http_host;
        proxy_set_header X-Forwarded-Proto https;
        proxy_redirect off;
        proxy_pass https://192.168.100.51;
        proxy_http_version 1.1;
    }
}
What will that do? A couple of very nice things, actually.
First, it will start a HTTPS web server listening on our RaspberryPi. That web server will be accessible on Raspberry’s VPN IP address (in my case on https://10.10.8.127). We are using self-signed “snakeoil” certificates, but you could set up your own certificates and sign them with Let’s Encrypt, if you want your phone to be accessible directly through internet (however, I would not recommend you that!). Then all the web traffic is redirected to IP address of a VoIP phone (192.168.100.51).
And probably the most cool thing is, that when you will connect to https://10.10.8.127/, your HTTPS connection will be established with modern encryption protocols (TLS 1.2 or more). Nginx will then establish different encrypted connection with VoIP phone, with TLS 1.0 or even SSL 3.0, but this connection will be then re-encrypted for you by Nginx, so you will be able to access VoIP phone with modern HTTPS encryption methods.
Actually, in /etc/nginx/sites-enabled/default configuration file you can add these lines before the location:
ssl_protocols TLSv1.2 TLSv1.3;
ssl_prefer_server_ciphers on;
ssl_ciphers 'TLS13-CHACHA20-POLY1305-SHA256:TLS13-AES-256-GCM-SHA384:TLS13-AES-128-GCM-SHA256:ECDHE-ECDSA-AES256-GCM-SHA384:ECDHE-RSA-AES256-GCM-SHA384:ECDHE-ECDSA-CHACHA20-POLY1305:ECDHE-RSA-CHACHA20-POLY1305:ECDHE-ECDSA-AES128-GCM-SHA256:ECDHE-RSA-AES128-GCM-SHA256:ECDHE-ECDSA-AES256-SHA384:ECDHE-RSA-AES256-SHA384:ECDHE-ECDSA-AES128-SHA256:ECDHE-RSA-AES128-SHA256';
And now, you will be able to establish high quality encryption connection (TLS 1.3 or 1.2) with your RaspberryPi vpnbridge, and then Nginx will establish less secure connection with VoIP phone, which is located in separate network.
But first we need to test the Nginx configuration: sudo nginx -t - hopefully you will see that everything is OK:
nginx: the configuration file /etc/nginx/nginx.conf syntax is ok
nginx: configuration file /etc/nginx/nginx.conf test is successful
And finally, you can restart Nginx server: sudo service nginx restart. Now I was able to open my browser and connect to my Aastra VoIP phone through vpnbridge device: https://10.10.8.127/.
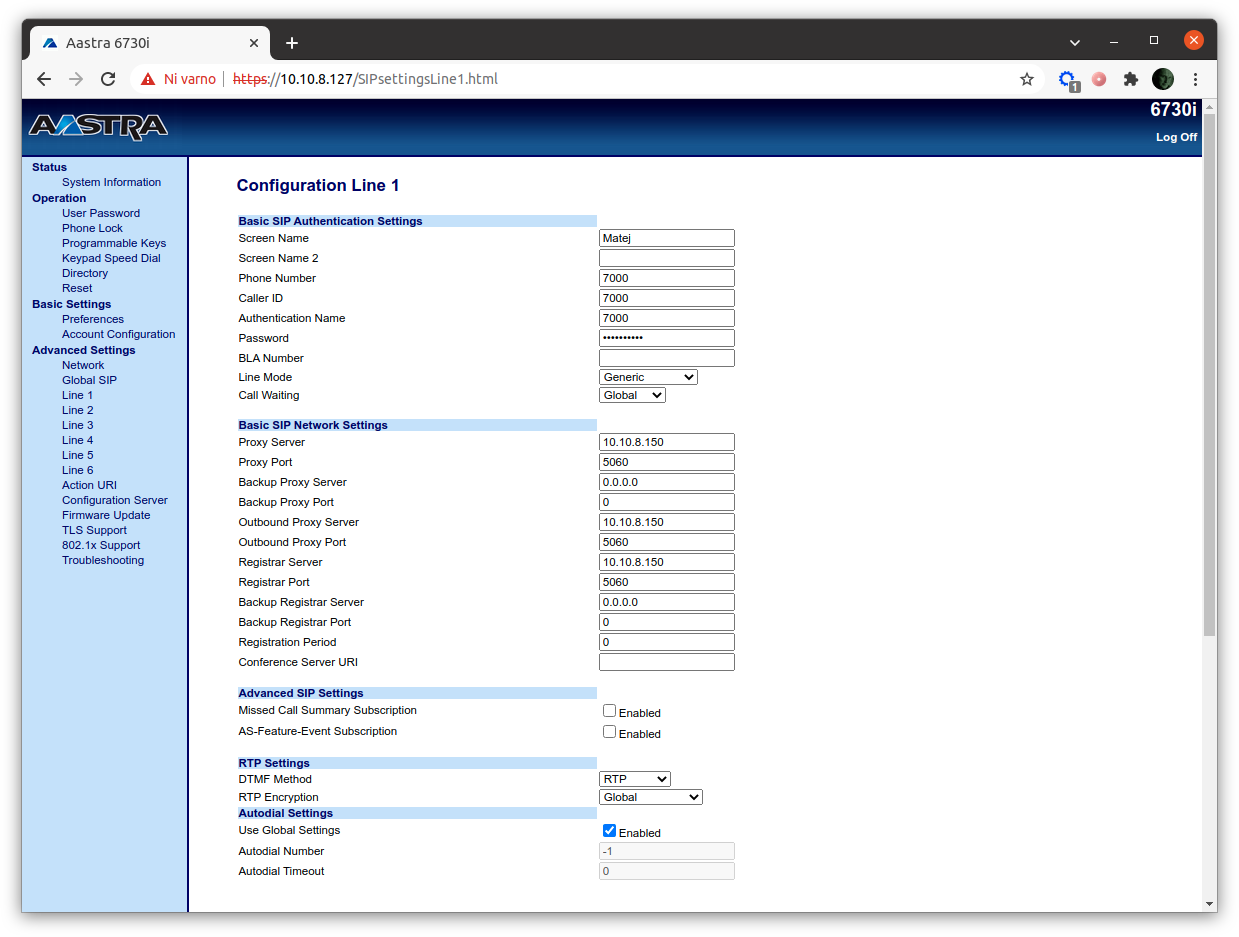
Finally, we will install firewall (sudo apt install ufw) and set it up:
- Set default rule-set (
sudo ufw default deny incomingandsudo ufw default allow outgoing). - Allow SSH connections from anywhere:
sudo ufw allow 22/tcp. - Allow web management of VoIP phone from my computer, but only if it is connected to VPN (my VPN IP si
10.10.8.10):sudo ufw allow from 10.10.8.10 to any port 443 proto tcp.
When this is done, we activate the firewall with sudo ufw enable. Please note that this is a firewall running on a RaspberryPi vpnbridge device, so it is limiting access to vpnbridge device. But indirectly this firewall is also limiting access to VoIP phone connected to our vpnbridge.
This results in the following. VoIP phone is accessible from the VPN, even it does not have the ability to run VPN client. It is also protected with firewall and good HTTPS encryption (TLS 1.2 or more), even VoIP phone does not have the ability to run firewall and to support modern HTTPS protocols.
Change unchangeable default password
Now, you may wonder, is it possible to change unchangeable password for Aastra phone administration? In fact, it is. But let’s look how to get rid of it first.
First we need to encode default Aastra’s phone username and password. We can do this on a RaspberryPi by running a command echo -n "admin:22222" | base64. It will return this: YWRtaW46MjIyMjI=.
Now open sites-enabled configuration file by typing sudo nano /etc/nginx/sites-enabled/default. Go to the location section and add this after proxy_pass line:
proxy_set_header Authorization "Basic YWRtaW46MjIyMjI=";
Save the file and restart Nginx: sudo service nginx restart. Now you will be able to access the Aastra’s phone web management directly, without need to entering username and password.
Now we just need to add new username and password to Nginx proxy. Let’s say our username will be matej and password MySuperCoolPWD123!.
So we enter this command: sudo sh -c "echo -n 'matej:' >> /etc/nginx/.htpasswd" to write our username in .htpasswd file. And then: sudo sh -c "openssl passwd -apr1 >> /etc/nginx/.htpasswd". Now we will e asked for a password and that is it.
Authentication username and password are now stored in /etc/nginx/.htpasswd, which looks like this:
matej:$apr1$cUzlGR14$WRgaPJ.0GAJeRgLN81vot.
There is also another cool thing. You can add more users (with different passwords) to this file, just repeat those two commands!
Anyway, we are not done yet. To enable authentication with .htpasswd file you need to open sites-enabled configuration file again (sudo nano /etc/nginx/sites-enabled/default) and add these two lines under server section:
auth_basic "VoIP phone";
auth_basic_user_file /etc/nginx/.htpasswd;
Restart Nginx with sudo service nginx restart and you are done! Now your old tech VoIP phone is behind firewall, supports modern HTTPS protocols and you can change unchangeable passwords for accessing management interface too! Isn’t that just great?
Ah, if you forgot the passwords or want to change something, you can always edit the file /etc/nginx/.htpasswd. Or just remove it and create it from scratch.
Anyway, if you are using VoIP phone over VPN network, you may experience larger network lag. I don’t have such problems, but I have read that if your calls are cutting out, or the phone loses registration, you should enable or increase the frequency of SIP keep-alive settings. Go to Advanced Settings → Line 1 and change Registration Period (under Basic SIP Network Settings) to a lower number.
Volume in voicemail messages
When using voicemail (these messages are sent to my e-mail), I noticed they voice files have quite low volume. However, this could be easily solved. Just go to Settings → Voicemail Admin → Settings → General and look for a field Volume Gain. This parameter allows you to specify how much gain to add to the message when sending a voicemail. There is also a note, that sox package must be installed on a system, but on RasPBX already is, so you do not need to worry about that.
I set this number to 7, and voice messages are much louder now. the rule is: higher the number, higher the volume. Try different numbers (for instance 2 and 9) and find the right balance for you.
And what can you do?
I hope you find this article interesting, and if you have a spare RaspberryPi laying around, you can try to set up RasPBX.
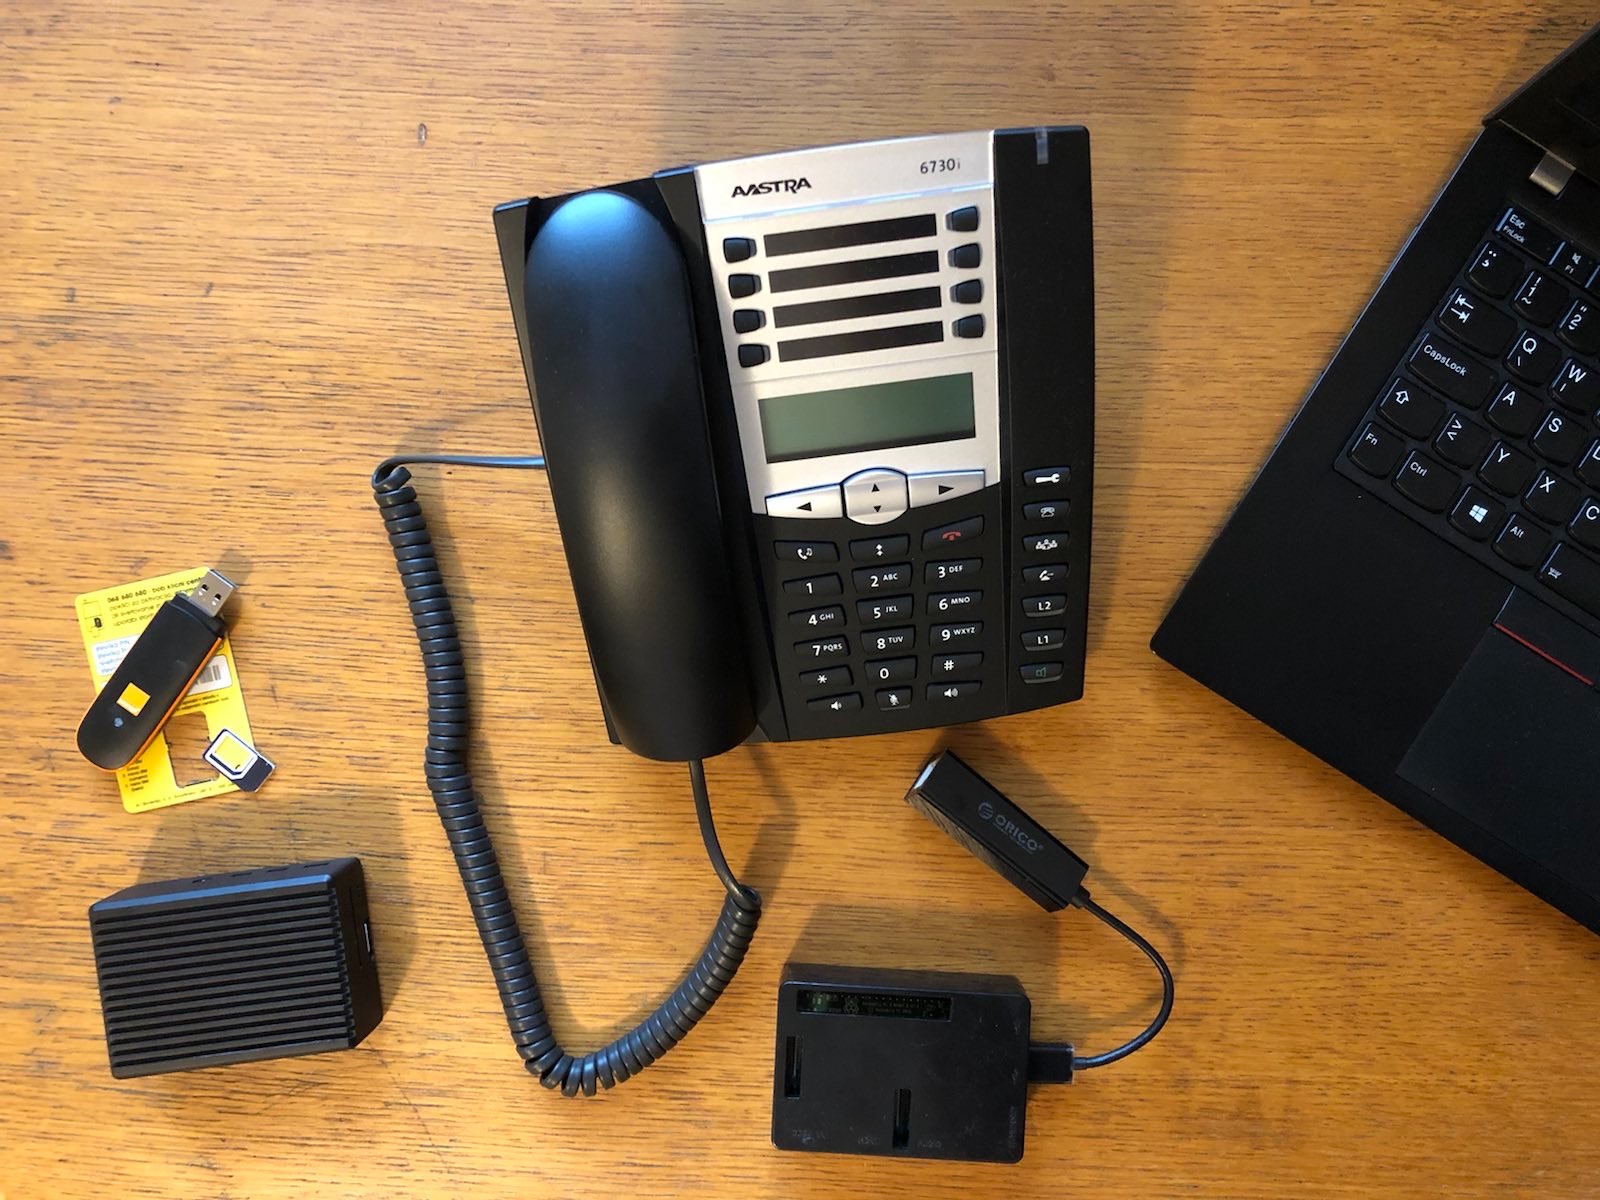
However, there are some things you, yes - you - can do.
If you are a web designer, you can put together some nice looking page for sending SMS messages (and USSD codes also).
If you are developer, you can try to fix receiving MMS messages, which does not work at all.
You can suggest me which SIP clients are nice looking and easy to use (and without nasty bugs). As I said, I prefer opensource, and those supporting SRTP, ZRTP and other security features.
There are probably many things that could be done with RasPBX, and I would like to hear your ideas, thoughts, experience and questions. Also, you can point me on my errors or if I wrote something stupid (which I probably did).
And finally, you can check out some of my lectures and projects, for instance:
- Video demonstration of CallerID spoofing and live interception of VoIP communications.
- GSM hacking and GSM security (PDF slides).
- All about VPN’s (PDF slides).
- Network forensic analysis of a mobile phone (PDF slides).
- …and many more (mostly in Slovenian language, however you can use Google translate).
Stay tuned and keep hacking!
Original RasPBX guide is published on my Github account, where you can also open issues.
Ključne besede: VoIP, SIP